
How to Make a Cross Stitch Pattern from a Photo
Make a cross stitch pattern from your photo: choose a clear crop, balance detail and colors, check the fabric size, and download a printable PDF with a thread list.
A favorite photo can make a personal cross stitch project, but a good-looking photograph does not always make an easy pattern. A small face can disappear into a few squares; a busy background can add hundreds of stitches you never wanted to sew.
To make a cross stitch pattern from a photo, choose a clear crop, set the level of detail and number of colors, check the finished size, then download the chart. We will work through those choices using one strawberry photo, so you can see what changes before committing to a project.
Use the cross stitch pattern maker alongside this guide. It creates a printable PDF with a picture overview, larger symbol charts, and a thread list. You can open our finished strawberry PDF first to see the result.
Choose a photo that will still look clear in stitches
Start with one recognizable subject: a flower, a piece of fruit, a pet’s face, or a simple building. Look for a clear outline and enough contrast between the subject and its surroundings. Soft shadows can work, but a face lost in deep shade will be difficult to recover in a small chart.
A photo becomes a grid in which each square is one stitch. Tiny details have little room. For a first project, a close view of one pet is a more manageable starting point than several people standing across a large garden.
Crop before uploading, using your phone’s photo editor or another editor you already have. Leave the edges that identify the subject, such as ears or petals, while removing space that adds little to the picture. You do not need a square crop: the tool keeps your photo’s proportions.
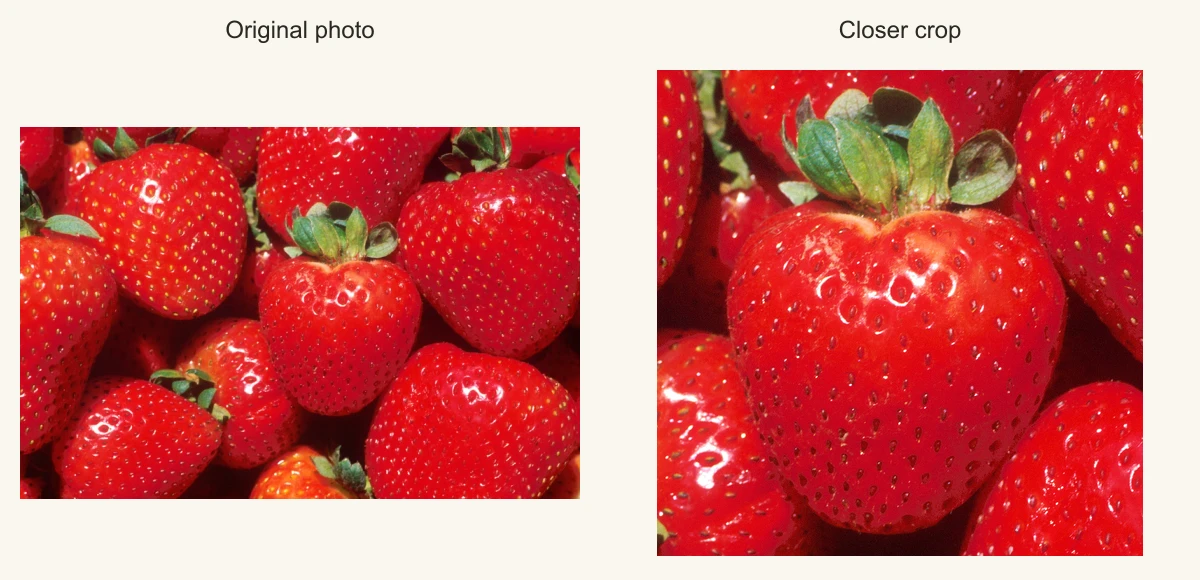
Our crop gives the main strawberry more of the available stitches. Want the subject surrounded by bare fabric? Remove the background in an image editor and upload a transparent PNG.
Upload the picture and start with the default preview
Click Choose your picture and select a PNG, JPG, or WebP file up to 10 MB. The chart appears automatically. To follow this exact example, save the cropped strawberry photo and upload it.
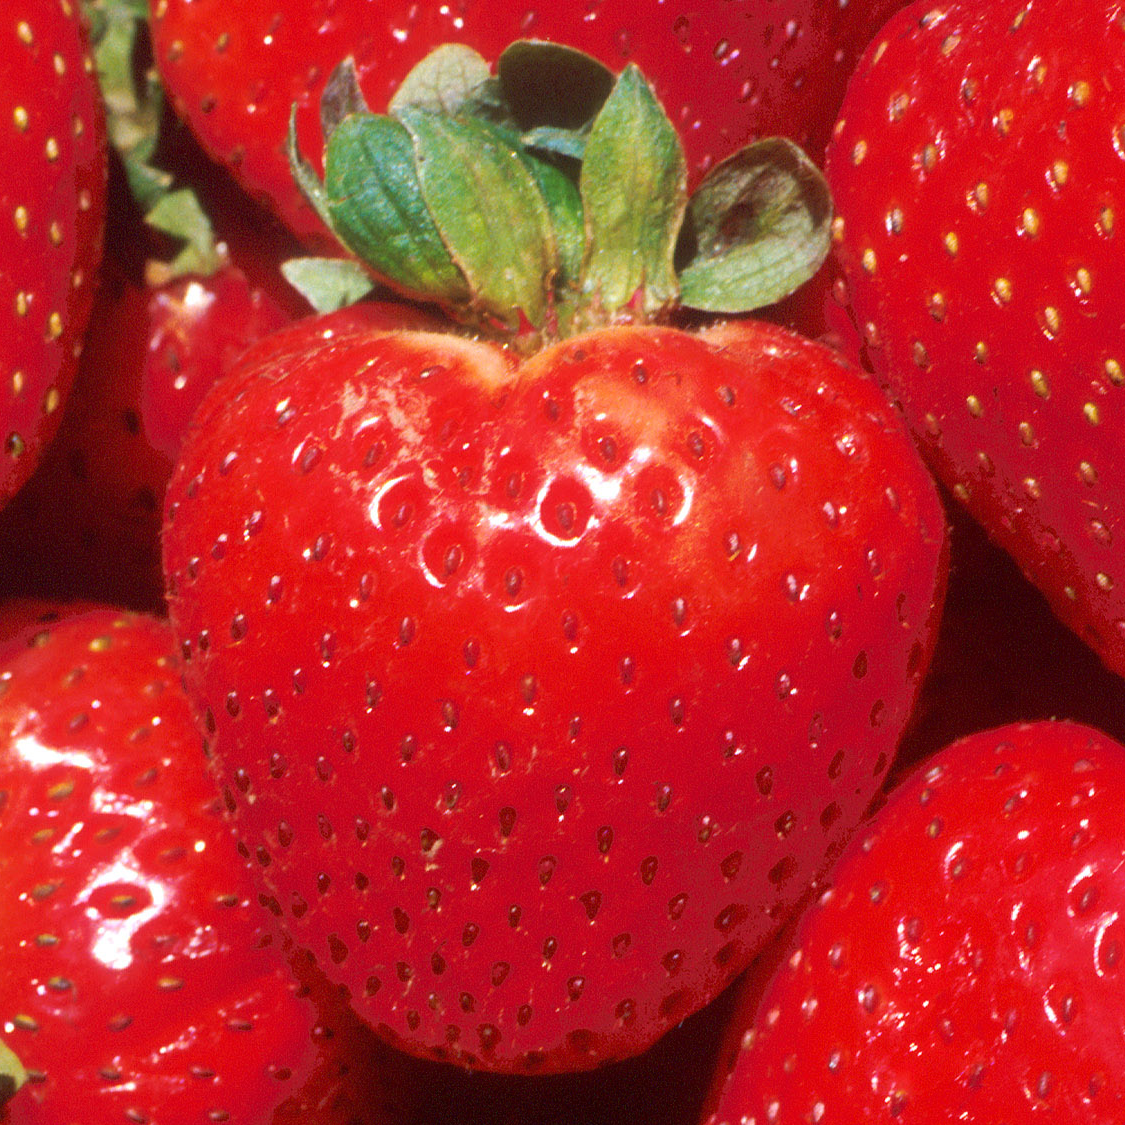
Start with the default 48 for Width in stitches and 16 for Maximum thread colors. You can change them after seeing the first result. The height follows the shape of your photo: our square crop produces a 48 × 48 pattern, while a portrait-shaped image will be taller.
Look at the feature that makes your subject recognizable. Can you distinguish the pet’s eyes from its fur? Is the flower separate from its leaves? If the subject itself is unclear, try a closer crop before increasing every setting.
Choose enough stitches for the details you want
Width in stitches controls how many squares describe your picture. More squares can preserve smaller features, but they also give you more stitches to sew.
Here is the same crop at 48 and 64 stitches wide, with the color limit kept at 16:
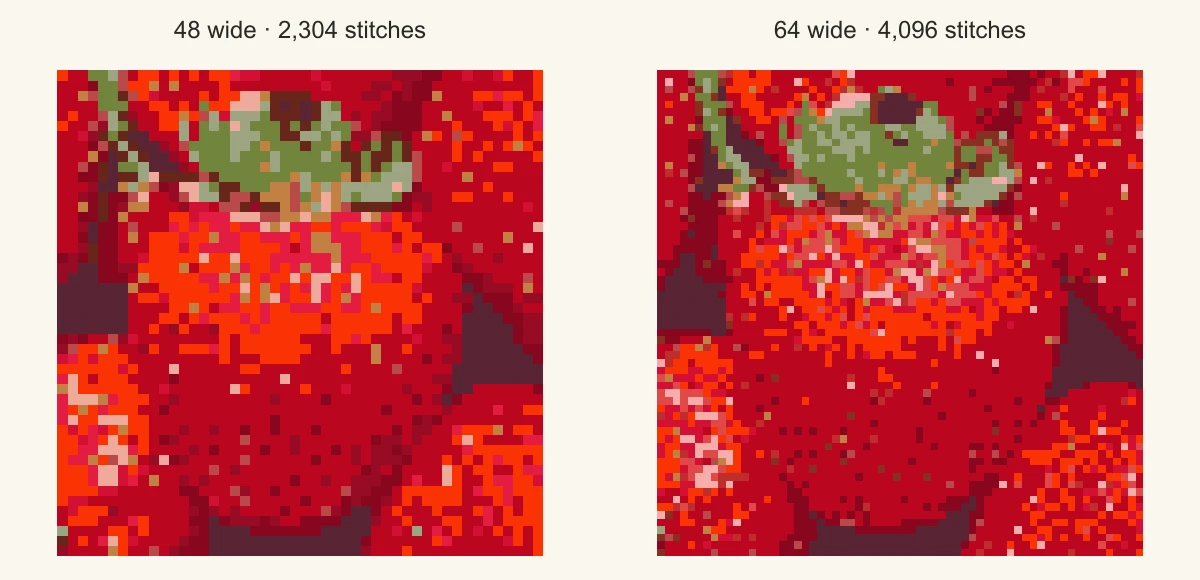
At 48, the strawberry has a bolder, simpler shape. At 64, more small highlights and seeds appear. That extra detail also brings more scattered color changes. Neither version is automatically the better project.
The square 48-stitch version has 2,304 stitches. Moving to 64 makes it 4,096 stitches. The width increased by only 16 squares, but both dimensions grew. Keep 48 if you like its appearance and want the smaller commitment; choose 64 if the extra detail is worth stitching.
For a more detailed photo, compare 64 and 96 in the preview. Stop when the important features look right, rather than choosing the largest number by habit. The tool supports up to 128 stitches on either side; a tall image may require a smaller width to keep its height within that limit.
Check how large the design will be on fabric
Stitch count and physical size are related, but they are not the same setting. Under Your fabric, choose the number printed on your fabric label.
Aida is the evenly woven fabric commonly used for cross stitch. Its count tells you how many stitches fit in an inch: 14-count holds 14, while 18-count holds 18. More stitches per inch make the same chart physically smaller. If you have not bought fabric yet, 14-count is a sensible starting point; DMC recommends it for beginners.
For our 48 × 48 chart, the tool shows 3.43 × 3.43 inches on 14-count and 2.67 × 2.67 inches on 18-count. Changing the fabric count does not add detail or reduce the 2,304 stitches—it changes how closely those stitches sit together.
Use Pattern area to judge the design size. Open Fabric margin to check Cut fabric, which adds extra cloth around the design for handling, a hoop, or framing. Adjust that allowance for your planned finish before buying or cutting fabric.
Balance shading against the number of colors
Under Maximum thread colors, compare 8 and 16 before trying 32. Fewer colors can make a bold design easier to organize; more can help preserve shading. The useful question is whether the extra shades make a feature you care about clearer.
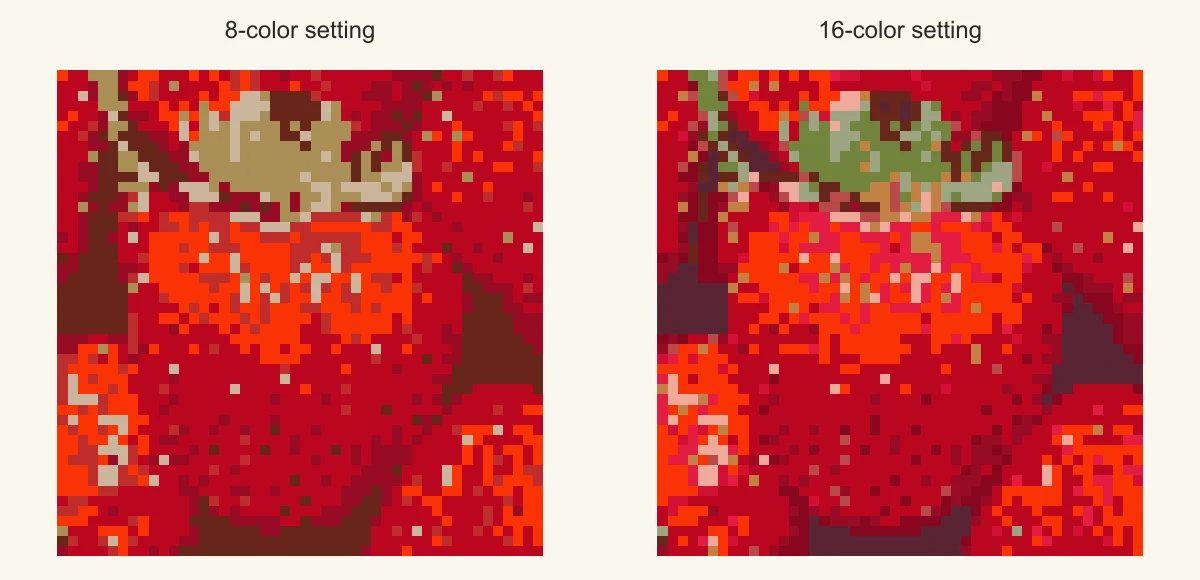
In this example, the 8-color setting loses much of the green in the leaves. The 16-color setting separates the leaves from the red fruit more clearly, so we keep 16 for the downloadable pattern. The limit is a maximum: this version ends up using 13 thread colors because some shades share a thread match.
Also look for confetti: isolated stitches or tiny groups that repeatedly switch color. A few may describe useful details, such as a seed or an eye. A lot of them in an unimportant background can make the project more fiddly without improving the subject.
If the preview is too busy, try a closer crop or a lower color limit and compare again. Do not assume reducing colors will remove every isolated stitch. If fewer colors erase the feature you want to keep, restore them and consider a simpler source photo instead. This tool converts pictures; it does not provide a brush for editing individual stitches.
Download a PDF with the chart and thread list
Once you like the preview and size, choose A4 or US Letter under PDF paper to match your printer paper.
Then choose Chart style:
- Color + symbols keeps colored squares behind the symbols, making it easier to relate the chart to the picture.
- Black & white symbols is useful for monochrome printing or marking completed stitches with a highlighter.
Click Download PDF. Both styles include the complete thread list. Our 48 × 48 A4 example has six pages: an overview, four larger chart pages, and the thread list. A pattern can span several pages even when its finished embroidery is small—the enlarged squares are there to make the symbols readable.
Keep the PDF for printing. Chart PNG is useful if you prefer viewing one chart image on a screen. Image only saves the colored design without the chart’s grid and labels; it is not the file to print as your stitching instructions. Download before closing the tool, because reloading clears the picture and settings.
Use the symbols to find your threads
The thread list is the chart’s legend. Each symbol points to one thread color, so you can tell similar reds apart even on a black-and-white print.
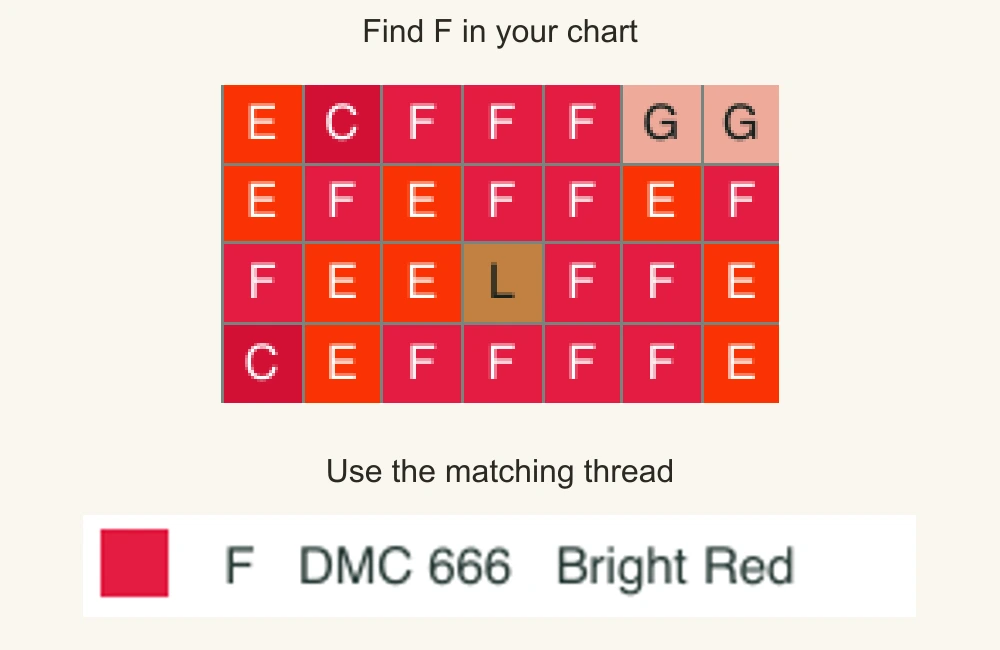
DMC is an embroidery-thread brand; the number in the list identifies a particular thread color. In this strawberry PDF, the symbol F points to DMC 666, Bright Red. Wherever you see F in a square, use that thread for the stitch. Other patterns may assign F differently, so follow the list supplied with your own PDF.
Use the list to check your thread stash or plan a shopping trip. The matches are based on digital colors, so compare the suggested shades with real thread before buying them. The stitch counts show how much of the design uses each color; they are not skein quantities.
Print the pattern and find your starting point
Open the PDF, select the paper size you chose, and print one detail page at Actual size or 100% first. Make sure the symbols and row numbers are clear, then print the remaining chart pages and thread list. Use the overview to see the whole design; use the larger detail pages to follow individual stitches.
Each detail page identifies its global row and column range. In this A4 strawberry chart, the first detail page covers columns 1–31 and rows 1–43. The next chart page starts at column 32, continuing the same rows. Match those numbers when moving between sheets. There is no repeated strip of stitches at the page edges, so do not stitch the boundary twice.
The printed squares are enlarged reading aids, not a life-size sewing template. Your fabric count determines the size of the finished embroidery. You can also read the PDF on a tablet if that is more comfortable than paper.
When you are ready to start, fold the fabric in half both ways to locate its center, then find the chart’s center marks. Use the overview to locate the corresponding detail page and count to your chosen starting stitch. Each filled square represents one full cross stitch. A blank square is left unstitched; a white square with a symbol still needs the thread listed for that symbol.
Keep the thread list beside the chart and mark the stitches you finish. Before putting the project away, note the page and row you are working on. Your PDF, original photo, and chosen settings give you a clear record if you want to make another version later.
Author

Categories
More Posts
How to Make a Perler Bead Pattern from a Picture
Make a Perler bead pattern from a picture. Follow illustrated steps for grid size, colors, bead counts and printable charts, with a free heart.
How to Make Pixel Art in Minecraft with a Block-by-Block Plan
Turn a picture into Minecraft pixel art: choose a build size, compare real block palettes, gather materials, and place each row from a numbered guide.
How to Make Game Assets for Your First Game
Learn how to make game assets for 2D and 3D games, from a consistent asset list to sprites, UI, sound and a working Godot example you can download.