
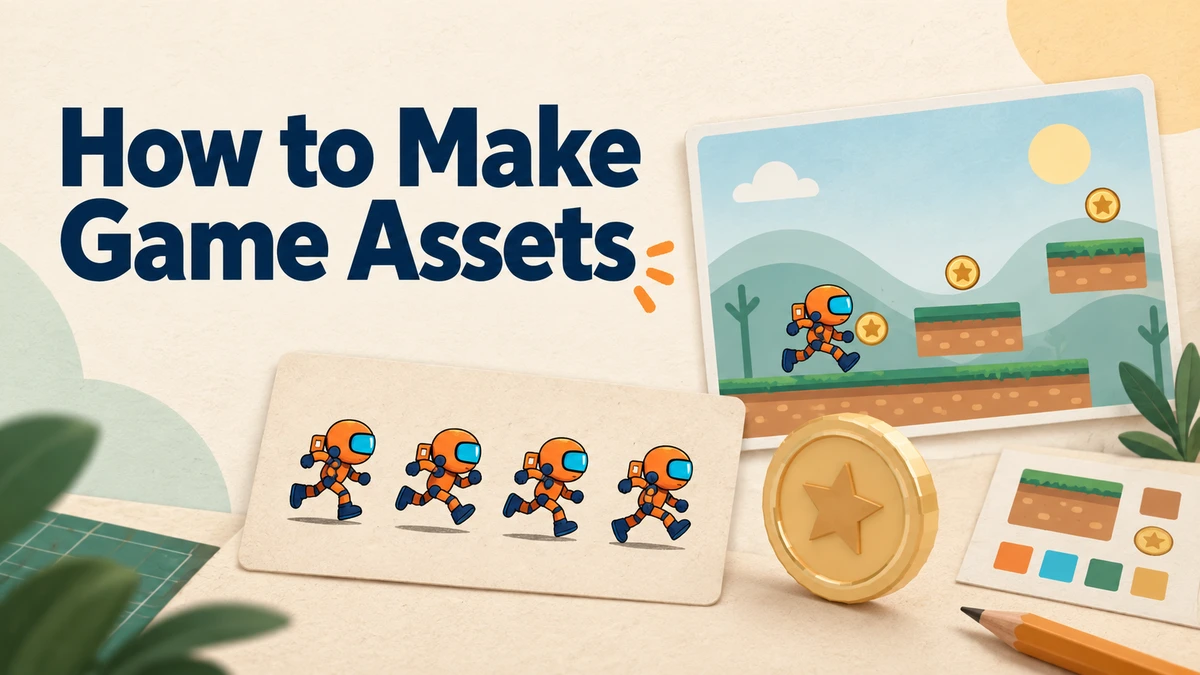
How to Make Game Assets for Your First Game
Learn how to make game assets for 2D and 3D games, from a consistent asset list to sprites, UI, sound and a working Godot example you can download.
To learn how to make game assets, start with what one playable scene needs. Choose a visual style, set the dimensions and export rules, create or adapt the files, then test them together in your engine. A small set that works together is more useful than a folder full of impressive images.
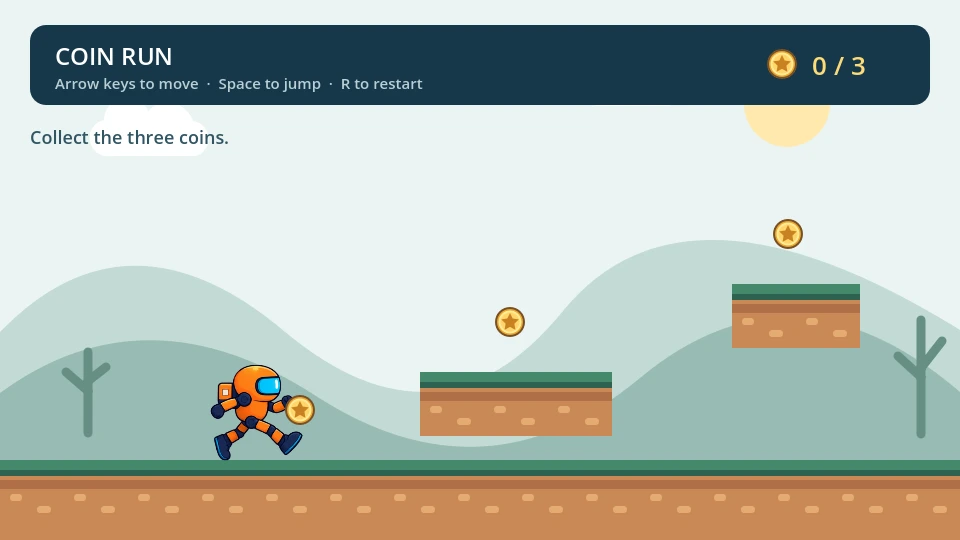
Think of the run-jump-collect loop in a Super Mario-style platform game. We built a small version with an original orange robot, three coins and two raised platforms. It uses a real character animation, simple scenery, a counter and short sound effects. You can download the starter project and editable assets to follow along.
The same planning process applies to 3D games. Later in the guide, we make a 3D version of the coin in Blender and bring its GLB file into Godot.
Start with an asset list for one scene
Game assets are the content your game uses: a character image, an animated action, a model, a button or a sound. The first question is what the player will do with them.
Write one sentence describing the scene. For our example: the robot moves across a short level, jumps onto platforms and collects three coins. That sentence gives us a manageable asset list:
| Asset | What we made | Why the scene needs it |
|---|---|---|
| Robot | One eight-frame run sheet; one held pose for jumping | Show movement and a recognizable player |
| Background | One 960×540 SVG | Establish the setting without adding more gameplay |
| Ground | One reusable 64×64 SVG tile | Build the floor and both platforms |
| Coin | One 32×32 SVG | Give the player something to collect |
| UI | A counter, instructions and a completion message | Explain the controls and show progress |
| Audio | A jump sound and a coin sound | Give immediate feedback for an action |
Start with the run animation and reuse one pose for jumping, as this demo does. Add enemies and background music once the basic level feels good to play.
This order also helps if you work with an artist. In a game-development discussion, a programmer describes the difficulty of communicating what they want and paying for repeated revisions. A list of actions, sizes and references gives the artist something concrete to respond to.
Choose a style you can keep consistent
Decide on the camera view before making the assets. A side-view robot belongs with side-view platforms. A top-down character needs a different environment and may need directional movement. Mixing the two makes scene assembly harder even if the individual images look good.
For this example, we chose rounded cartoon shapes, dark outlines and a cyan-and-orange character against a quieter green background. The coin uses a bright yellow accent so the player can find it quickly. The scenery is deliberately simpler than the robot.
Make a small style reference containing one character, one prop and a piece of ground. Put them beside each other at their intended game size. Compare outline thickness and lighting before producing the rest of the set. Zooming in can hide a mismatch that becomes obvious during play.

Pixel art is one possible style, rather than a requirement for 2D games. Our robot has smooth outlines. If you choose pixel art, use a pixel editor and learn the basic drawing process in our pixel art tutorial. Keep that decision consistent across the character, tiles and UI.
Decide what to draw, generate, buy or commission
You do not have to make every asset the same way. Pick the method that gives you enough control over the asset's actual job.
| Method | A useful starting point | What you still need to check |
|---|---|---|
| Draw it yourself | Simple scenery, icons and props you expect to edit often | Readability and consistency with the rest of the scene |
| Use an asset pack | A matching environment or an early prototype | View, dimensions, available actions and the pack's license |
| Generate a draft | A character or action you can describe clearly | Identity, pose sequence, transparency and framing |
| Commission an artist | A distinctive character or a coherent finished set | References, deliverables, revision scope and usage terms |
For hand-drawn 2D art, Krita is a practical raster-painting option. A vector editor such as Inkscape suits shapes such as our scenery and coin. Choose one based on the result you need; you can start with a mouse and simple shapes.
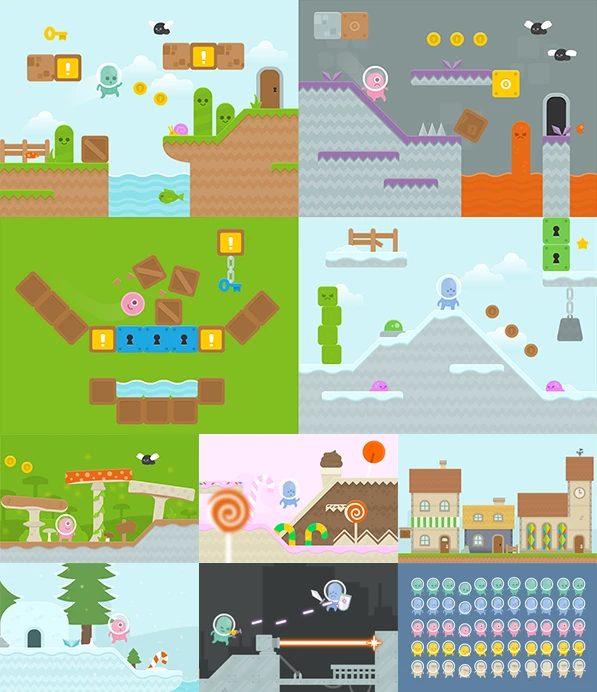
An asset pack can save work when it already matches your game. The Kenney Platformer Art Deluxe pack shows how the same shapes and colors can carry across terrain, props and characters. Starting with one coherent pack is easier than trying to make unrelated downloads fit together.
Make the 2D character and its actions
Start with a readable silhouette. At the size your game uses, the player should be able to recognize which way the character faces and what it is doing. Small details come later.
We used the Sprite Sheet Generator for one specific task: an eight-frame, right-facing robot run. The character description fixed the orange body, cyan visor and dark boots. The action request specified a looping run in place, with the same scale and position throughout.
You can start with text or upload a reference image. If you need to settle the design before making an action, use the Sprite Character Generator first. After an action is ready, Continue editing opens its existing project so you can work from the same result.
Our exported run sheet is 1024×512 pixels, arranged as four columns and two rows. Each frame has a 256×256 transparent canvas. Read it left to right, then continue along the second row.
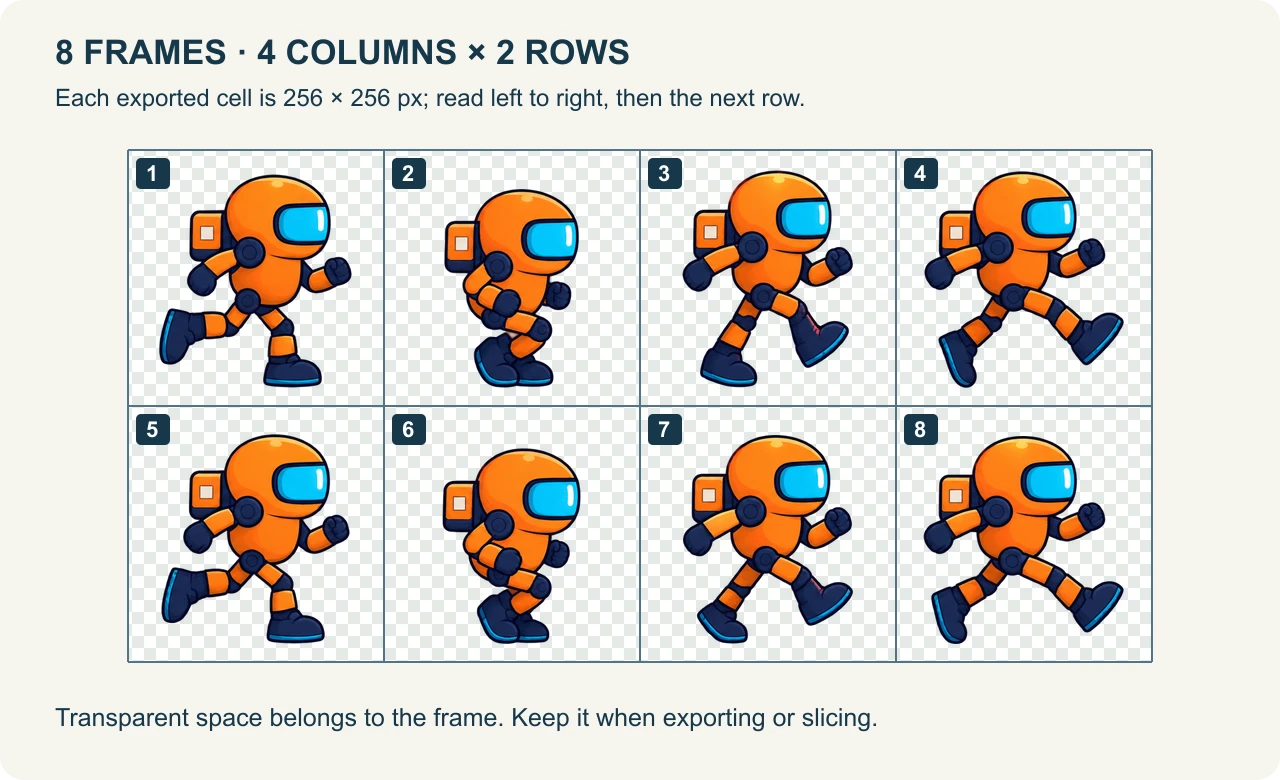
Play the sequence before using it. Look for a face that changes shape, a limb that switches sides or an effect that crosses the edge of its cell. Then check the transition from the last frame back to the first. An action that finishes cleanly may still be unsuitable for looping.
Keep the full canvas and a shared origin
Keep every pose on the same-size canvas, with the feet at the same height. That keeps the robot steady as its arms and legs move.
Keep that space around the character. Cropping each pose to its own outline and placing every cropped image at the same center changes the character's position. If your pipeline trims frames, it needs to preserve an offset for each one.
Try the lightbox below. Drag through the eight real poses with Full canvas selected, then switch to Crop & center. The artwork stays at the same scale. Only its placement changes: centering each trimmed silhouette moves its feet by a different amount. Use Play to see why that small difference matters across a loop.
Set the timing separately from the artwork
If the run feels too slow, shorten Frame duration before generating new artwork. For this eight-frame animation, 100 milliseconds per frame gives a quick 0.8-second loop; 200 milliseconds gives a slower 1.6-second loop. Use the lightbox above to compare them.

Use the preview speed control to try a pace, then change the frame-duration fields to save it. Match that speed when you import the animation into your game.
Build the environment from reusable pieces
Our background is an editable SVG made from simple original shapes. It uses pale hills and clouds so it does not compete with the player. The 64×64 floor tile supplies the floor and both raised platforms.
A tileset is the collection of reusable tiles; a tilemap places those tiles into a level. A sprite sheet is a way of arranging images in one file. Sharing a grid does not make these three things interchangeable.
For an initial scene, one straight ground tile may be enough. A larger level may need corners, slopes or transitions between materials. Check those pieces beside each other before filling a whole map: a tile that looks good alone can reveal a seam when repeated.
If you already have a regular sheet and need individual images, the Sprite Sheet Cutter can separate its cells. Set the actual cell size, margin and spacing. Cutting keeps the source pixels; it does not create new terrain or repair mismatched edges.
In the small demo, we placed repeated tiles and gave each platform a rectangular collision shape. In a larger Godot level, use its tilemap tools to manage placement and tile collision data. Keep decorative background pieces separate from surfaces the player stands on.
Make a simple 3D game asset in Blender
A coin is a manageable first 3D prop: a thin disc, a gold material and a few details that catch the light. Open coin.blend from the starter download to try changing its shape or colors.
Build the shape, then add a material
To make your own coin:
- Add a cylinder and flatten it into a thin disc.
- Stand it upright and add a small bevel to soften the edge.
- Give it a gold material. Add a rim or a raised symbol if you want more detail.

Zoom out to the size the coin will appear in your game. The outline and symbol should still be easy to recognize.
Export the coin to Godot
Select the coin's parts in the Outliner and choose File → Export → glTF 2.0. Set the format to glTF Binary (.glb) and enable Selected Objects to export just the coin. Save the .blend too, so you can edit it later.

Copy the GLB into your Godot project's asset folder. Double-click it in the FileSystem dock to preview the model and its materials, then drag it into your scene.

Size the coin to suit your level and check it under the game's lighting. Adjust the gold material if it looks too dark or blends into the background.

Use GLB to move the finished model into your game, and keep the .blend as your editable source. Godot's 3D import guide covers other supported formats.
Make UI and sound that respond to the player
UI assets help the player understand what is happening. Our counter reuses the coin icon next to 0 / 3. It changes after each pickup, and the completion message appears after the last one. We built the labels and panel with Godot controls rather than turning all the text into images.
For a button, decide which states the player needs to recognize. A normal, hovered and pressed state should feel like one component. Test text at the actual display size, especially if your game must fit a phone screen. Use a font whose license allows your intended use.
Give jumping and collecting a coin short, distinct sounds. Connect each sound to the action in your game so the player hears it immediately.
You can record your own effects or synthesize simple ones. In an audio editor such as Audacity, trim unnecessary silence, add short fades to avoid abrupt edges, and export a file your engine accepts. Its recording and exporting guide provides a starting point.
WAV is a useful choice for short effects. For longer music, compare compressed formats and test the loop boundary. Godot supports WAV, Ogg Vorbis and MP3; its audio import guide explains the tradeoffs. In either case, balance the sound in the running game so repeated pickups do not overwhelm everything else.
Bring the assets into Godot
Keep editable sources in a separate folder, and copy the exported PNGs and GLBs into your Godot project. Give each export a clear name, such as robot-run.png or coin.glb, so you can find and replace it later.
Play the robot's run animation
- Copy the robot PNG sheet into your project and add an
AnimatedSprite2Dnode. - Create a
SpriteFramesresource, then choose Add frames from a Sprite Sheet. - Set Horizontal to 4 and Vertical to 2. Click Select All, then Add 8 Frame(s).

Name the animation run, enable looping and set 10 FPS to match the example. Click Play to watch it. If you want a slower run, lower the FPS.

For pixel art, use nearest texture filtering to keep the edges crisp. Godot's sprite animation guide walks through the animation editor in more detail.
Try the assets together
To try the finished example, download the Coin Run starter ZIP, open CoinRun/project.godot and run the main scene. Use the arrow keys to move and Space to jump. Open coin-3d.tscn separately for the 3D coin.
Run the level. Check that the robot stays steady as it runs, lands on the platforms and collects coins. Each pickup should disappear, update the counter and play its sound.
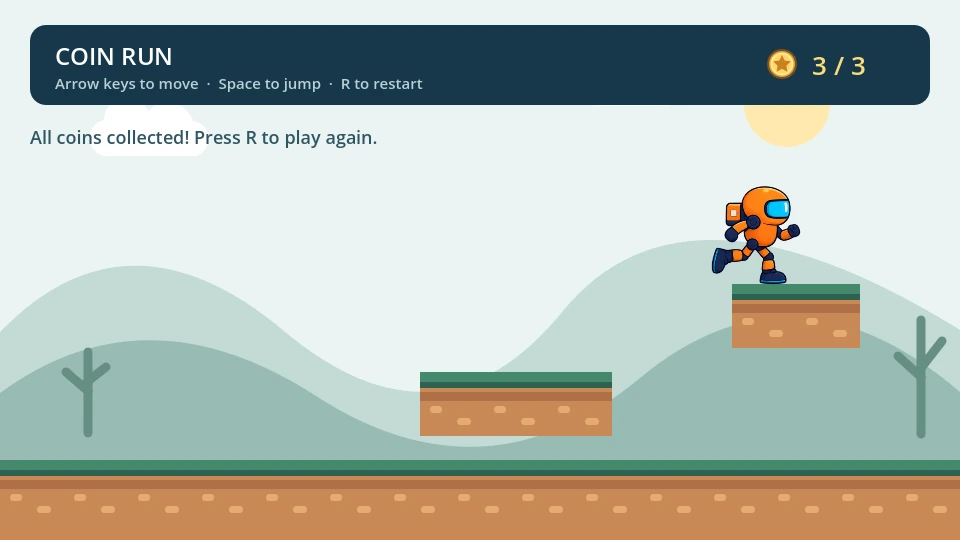
Replace one asset first: change the coin, the ground tile or the robot's run sheet. Play the level again to see how it fits before adding more.
Image credit: Kenney Platformer Art Deluxe, CC0. Robot artwork generated in SpriteFuse; the remaining example artwork, model and sounds are original.
Author

Categories
More Posts

How to Make Pixel Art: Draw Your First 16×16 Mushroom
Learn how to make pixel art with a step-by-step mushroom tutorial, a downloadable grid, crisp PNG exports, and a Minecraft block-building plan for beginners.
8 Free Fuse Bead Patterns with Printable PNG & PDF Charts
Find 8 easy fuse bead patterns with numbered PNG charts, A4 and Letter PDFs, exact color counts, and helpful tips for making each design on a square board.
How to Make a Cross Stitch Pattern from a Photo
Make a cross stitch pattern from your photo: choose a clear crop, balance detail and colors, check the fabric size, and download a printable PDF with a thread list.