

How to Make Pixel Art: Draw Your First 16×16 Mushroom
Learn how to make pixel art with a step-by-step mushroom tutorial, a downloadable grid, crisp PNG exports, and a Minecraft block-building plan for beginners.
Start with a 16×16 canvas, a one-pixel pencil, and a small palette. Draw a recognizable outline, fill the large areas, add a few highlights and shadows, then export a PNG. You do not need to draw a detailed character or buy a tablet to learn how to make pixel art.
In this pixel art tutorial, you will make the mushroom below. The same pattern works in a pixel editor, on a printed grid, or as a small Minecraft build. Download the finished example if you want a reference beside your canvas, but try drawing the outline yourself first.
Choose your path: follow the drawing tutorial, or jump to the Minecraft block mural. You can tap any step diagram to enlarge it.
Choose a tool and make a small canvas
Use a pixel editor that lets you set the canvas dimensions, draw with a one-pixel pencil, enter colors, and export PNG. Piskel is a free browser-based option with pixel drawing and PNG export. If you already use a desktop editor, keep using it; this exercise does not depend on a particular interface.
Create a new image with a width of 16 pixels and a height of 16 pixels. Choose a transparent background. Zoom in until individual squares are easy to click, then select the pencil with a size of one pixel. Turn off smoothing or anti-aliasing if your editor offers it for the drawing tool. You want each click to fill one square with one solid color.
Zooming makes the canvas look bigger without adding pixels. Resizing changes the image dimensions. Keep those actions separate: you need room to see the squares, not a larger drawing. In Aseprite, for example, the sprite size documentation distinguishes changing the canvas from resizing its contents.
Prefer drawing on paper? Open the pixel art grid template tool, choose a blank 16×16 grid, and export a PNG or single-page A4/Letter PDF. Numbered rows and columns make it easier to follow the pattern below. SpriteFuse creates the reference grid; you color the squares in your drawing app or on paper.
How to make pixel art, step by step
The mushroom uses five colors plus transparent space. Enter these HEX values in your editor, or choose close matches if you are using pencils. The letters are a key for the downloadable pattern, not text to draw inside the artwork.
| Letter | Color | HEX | Where it goes |
|---|---|---|---|
| X | Dark purple | #352F44 | Outline |
| R | Red | #E65359 | Mushroom cap |
| H | Cream | #FFF1CD | Spots and stem highlight |
| S | Dark red | #B9364E | Lower-right cap shadow |
| T | Tan | #D9AA78 | Stem |
1. Draw the outline
Count rows from the top and columns from the left, starting at 1. Leave the first row empty. On row 2, draw the four dark pixels in columns 7–10. That is the top of the cap.
Widen the cap as you move down. Row 3 has outline pixels at columns 5–6 and 11–12. On row 4, use columns 4 and 13. Rows 5–6 use columns 3 and 14; rows 7–8 use columns 2 and 15. Join the bottom of the cap with a horizontal dark line across row 9, columns 2–15.
For the stem, put dark pixels in columns 6 and 11 on rows 10–13. Close its bottom with four pixels across row 14, columns 7–10. Leave rows 15 and 16 empty.
Step back or reduce the zoom. You should recognize a broad cap above a short stem before you add any color. If the outline looks like a rectangle, check the rows near the top: the cap widens in steps instead of having straight vertical sides.
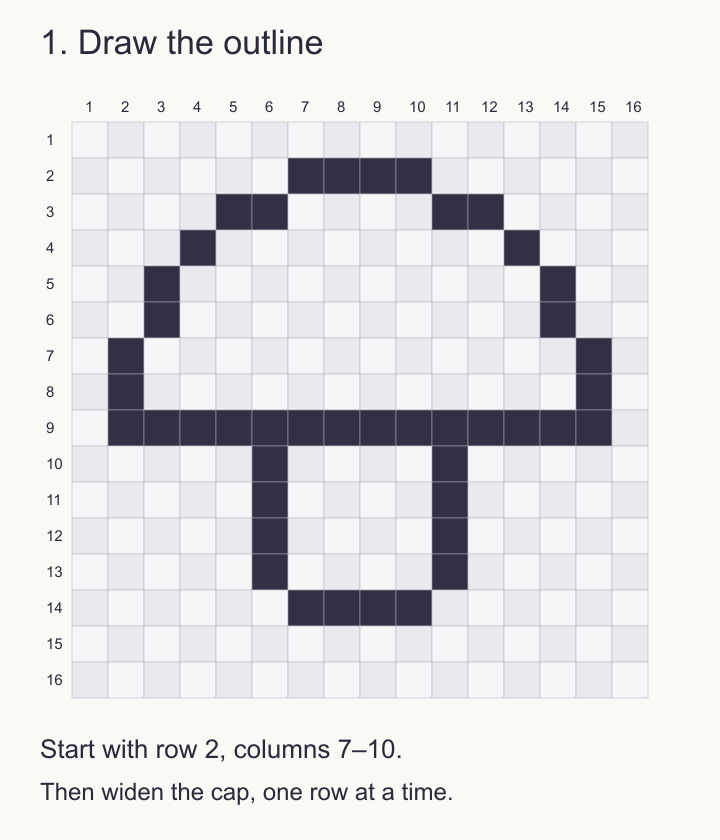
Each dark square is one pencil click. The checkerboard stays transparent.
2. Fill the two large areas
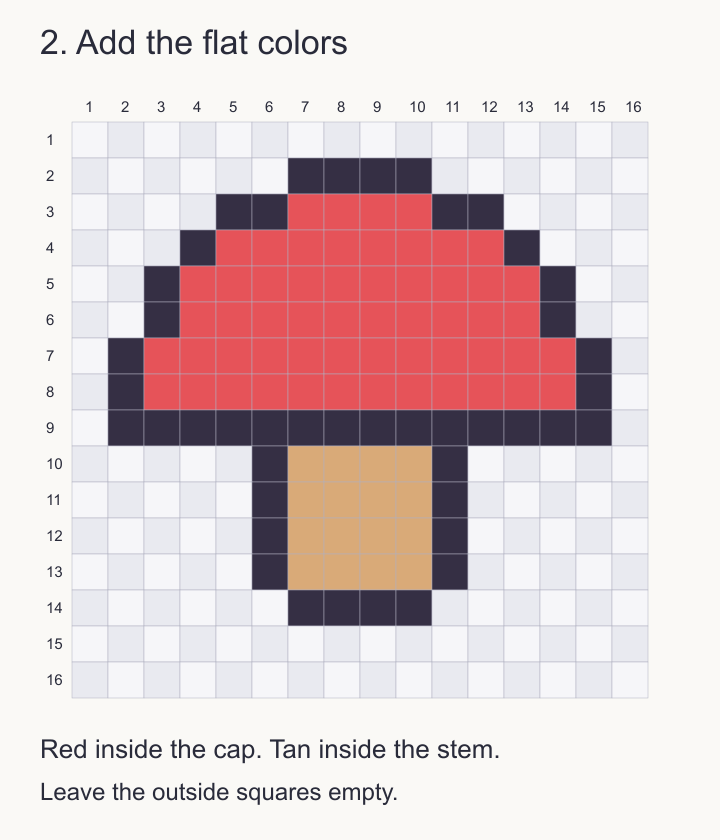
Use the one-pixel pencil to color the inside of the cap red and the inside of the stem tan. Work along one row at a time, stopping before each dark outline pixel. Keep the outside transparent.
For this small drawing, coloring individual cells makes it easy to follow the stepped edges. If you paint outside the outline, undo that stroke or erase the extra cell before moving to the next row.
At this stage, your image should match the flat-color diagram below. There are no spots or shadows yet. This is a useful stopping point: a clear silhouette and two large color areas already communicate the subject.
3. Add spots and one small highlight
Use cream for three spots on the cap. Color columns 7–8 on rows 4–5; column 11 on row 5 plus columns 11–12 on row 6; and columns 5–6 on rows 7–8. These uneven clusters give the mushroom a little variation without adding another color.
Add a narrow cream highlight to the stem at column 8 on rows 11–12. Keep the other stem pixels tan. At this size, a two-pixel mark can be enough. A large stripe would compete with the cap.
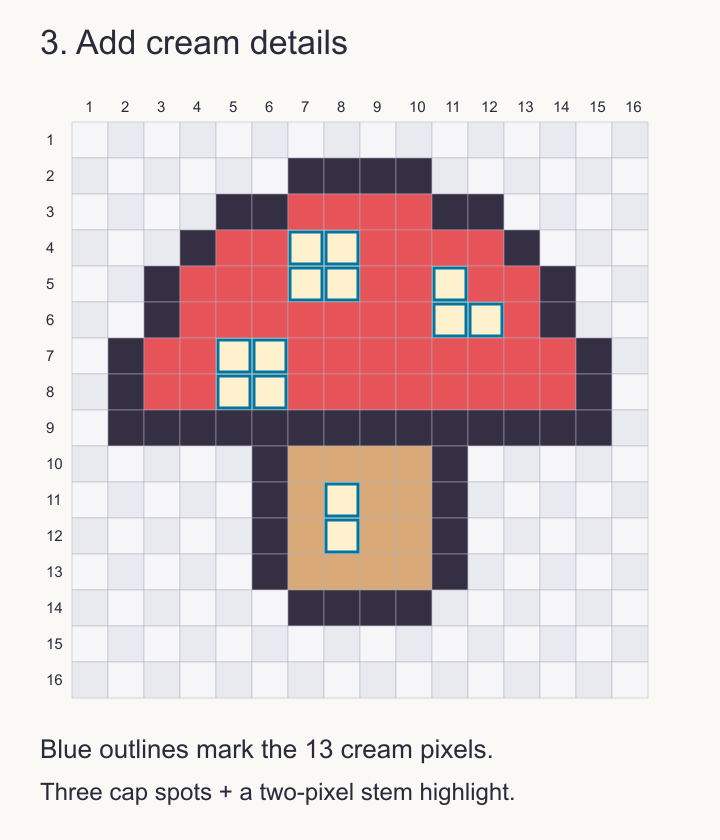
Blue borders identify the pixels to change; do not draw blue into your artwork.
4. Shade the lower-right edge
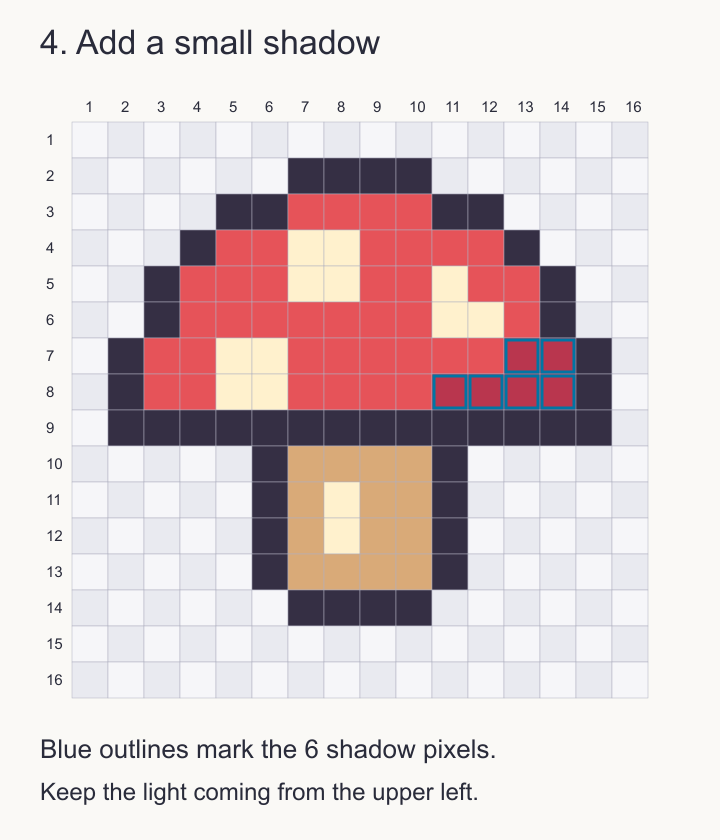
Replace the red at columns 13–14 on row 7 and columns 11–14 on row 8 with dark red. That makes a six-pixel shadow along the lower-right part of the cap.
Treat the light as coming from the upper left. You do not need a gradient or a different shade for every row. One connected shadow is easier to read than scattered dark pixels. Keep the dark outline intact so the mushroom still stands out against a light background.
5. Check the finished pattern
Compare your result with the finished diagram above. Check the shape first, then the spots, then the six shadow pixels. A misplaced pixel is easier to find by row and column than by repeatedly redrawing an entire edge.
Rows go down; columns go across. Empty squares stay transparent. The full numbered reference with HEX colors is also available separately.
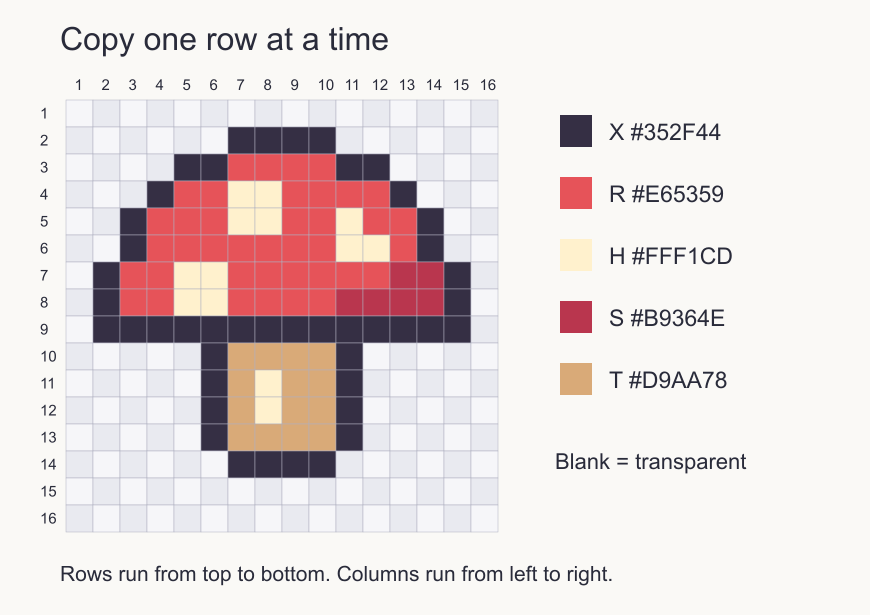
Download the plain-text pixel pattern if you prefer following letters. Each line contains 16 cells; a dot means leave that cell empty. You can also compare the actual PNG files: outline, flat colors, and finished 16×16 mushroom.


The finished drawing contains 116 colored pixels and 140 transparent pixels. If you reproduce it exactly, those counts offer a quick way to check whether you accidentally filled the background. Your own variation does not have to match the count.
Export pixel art without blurry edges
Save your editable project first so you can change the palette or move a spot later. Then export the drawing as a PNG at its original 16×16 size. That small file is the artwork; it is normal for it to look tiny when shown without enlargement.
For a larger image to share, resize a copy by a whole-number scale using nearest-neighbor interpolation, sometimes labeled a hard-edge or pixelated resize. For this example, 32× enlargement turns 16×16 into 512×512. Each original pixel becomes a solid 32×32 square.
The 512×512 mushroom PNG provides that enlarged version. Compare an edge with your export. If yours has fuzzy intermediate colors, change the resize method and export again. Saving a blurry enlargement as PNG will preserve the blur; the file format does not undo smoothing.

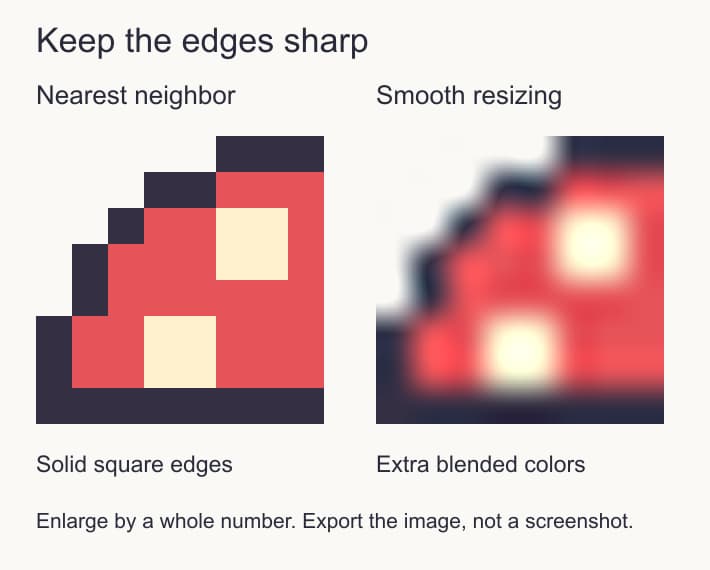
Compare the diagonal outline: nearest-neighbor keeps one solid color per enlarged square.
Avoid taking a screenshot of the editor as your final artwork. It may include the grid, checkerboard, cursor, or a partly scaled preview. Exporting the image keeps the background genuinely transparent.
Turn your drawing into a reusable grid
Once you have a PNG, open SpriteFuse Pixel Art Grid and upload the native 16×16 file. Keep the output at 16 columns and 16 rows. Use the original-color option for this small example so its five colors remain distinct.
Use the numbered rows and columns when you want to copy the design by hand. The color legend supplies HEX values and cell counts. Export the numbered pattern as PNG for viewing on another screen or as a single-page PDF for printing. This tool runs locally in your browser and is free to use without an account.

Actual output from uploading the tutorial PNG with its original size and colors preserved. Download this numbered chart.
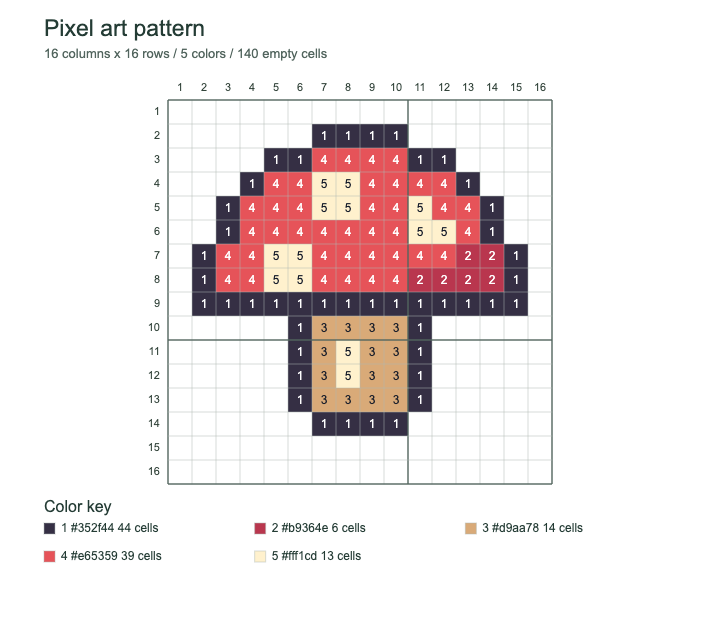
Use the original small image rather than a screenshot or enlarged preview as your source. A screenshot can turn a visible checkerboard into colored image pixels. Check that the areas outside the cap and stem are empty in the resulting chart before you print it.
For your next design, try a strawberry, a tiny house, or a leaf on another blank 16×16 grid. Change the outline first and reuse a small palette. Move to 32×32 when the subject needs more room for recognizable features, not just because the empty canvas feels restrictive.
How to make pixel art in Minecraft
For a first Minecraft pixel art build, use one block for each colored pixel. The mushroom fits within a 16-block-wide by 16-block-high planning area. The actual colored shape spans 14 blocks across and 13 blocks high; transparent margins do not need blocks.
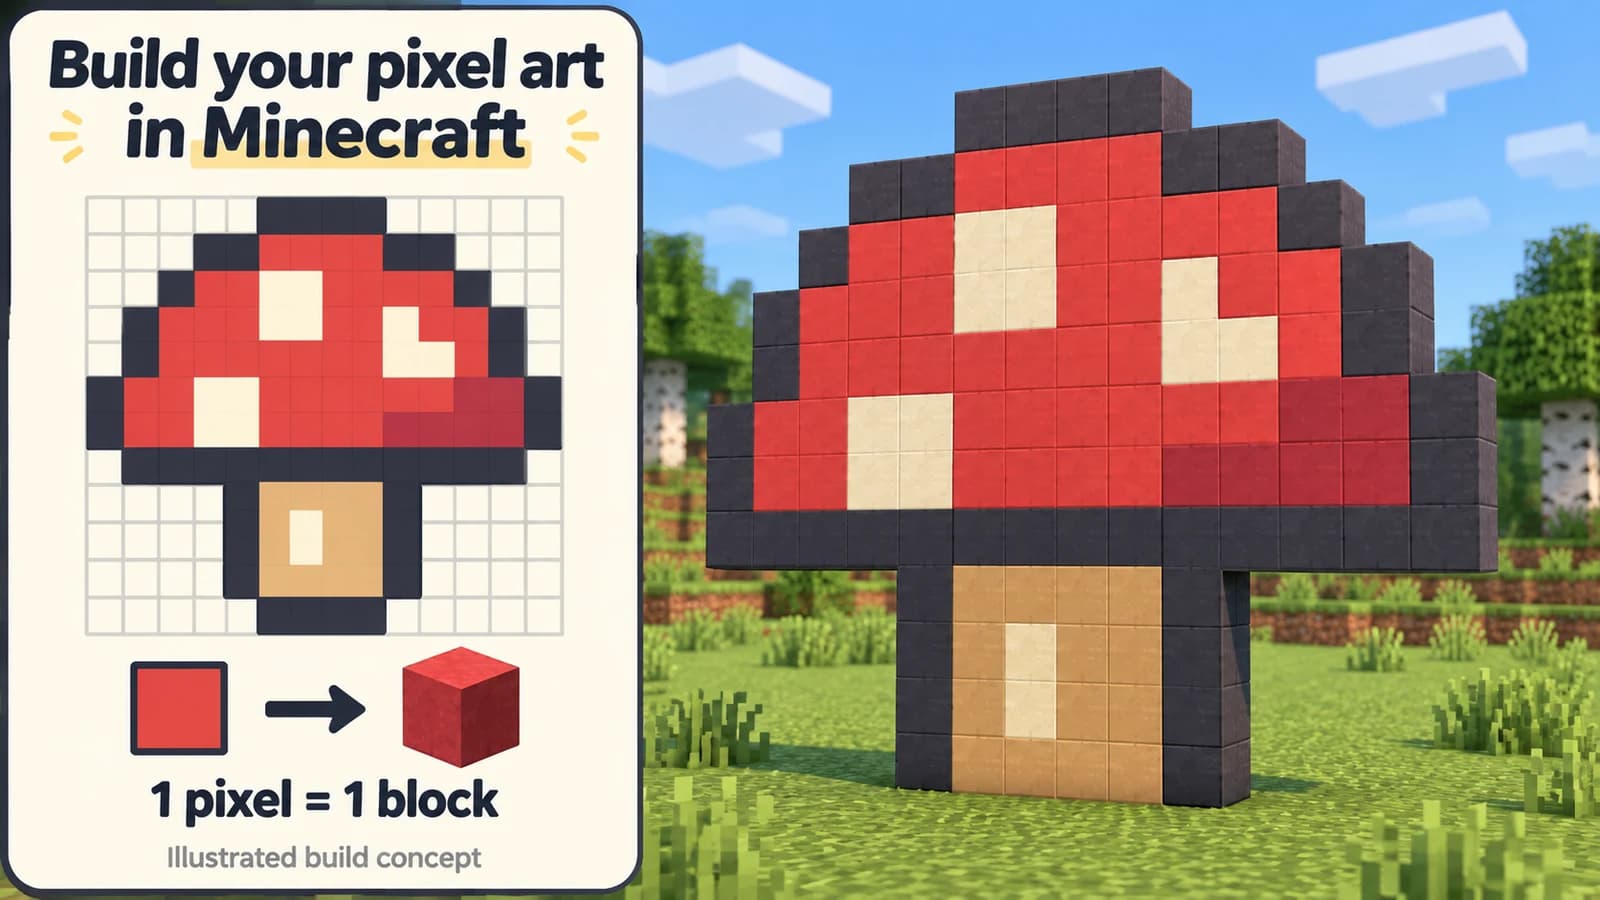
Illustrated build concept, not a gameplay screenshot. Use the numbered chart for exact block placement; the scene shows the idea and the one-block-thick upright shape.
The goal is a flat mural, not a sculpted mushroom. Minecraft block colors will not exactly match the drawing's HEX values, so place a few sample blocks together and choose the combination you prefer.
| Pattern letter | Suggested block | Blocks for this design |
|---|---|---|
| X | Black concrete | 44 |
| R | Red concrete | 39 |
| H | White concrete | 13 |
| S | Red terracotta | 6 |
| T | Brown terracotta | 14 |
Choose an open area and make a flat, upright mural. Creative mode makes it easier to reach the upper rows and replace a mistake. Mark the left edge of your 16-column planning area so the numbering stays consistent as the shape widens.
Start with row 14, the bottom four outline blocks, and work upward toward row 2. The printed chart runs top to bottom, while a wall is easier to build from the bottom up. Rows 15–16 are empty margin; they do not require a foundation made of artwork blocks.
Build rows 13–10 of the stem next. For each row, place the two dark side blocks and the four interior blocks, using the cream highlight where the chart shows H. Then build the wide bottom edge of the cap at row 9. Continue upward one row at a time, checking the column numbers before you place each color.
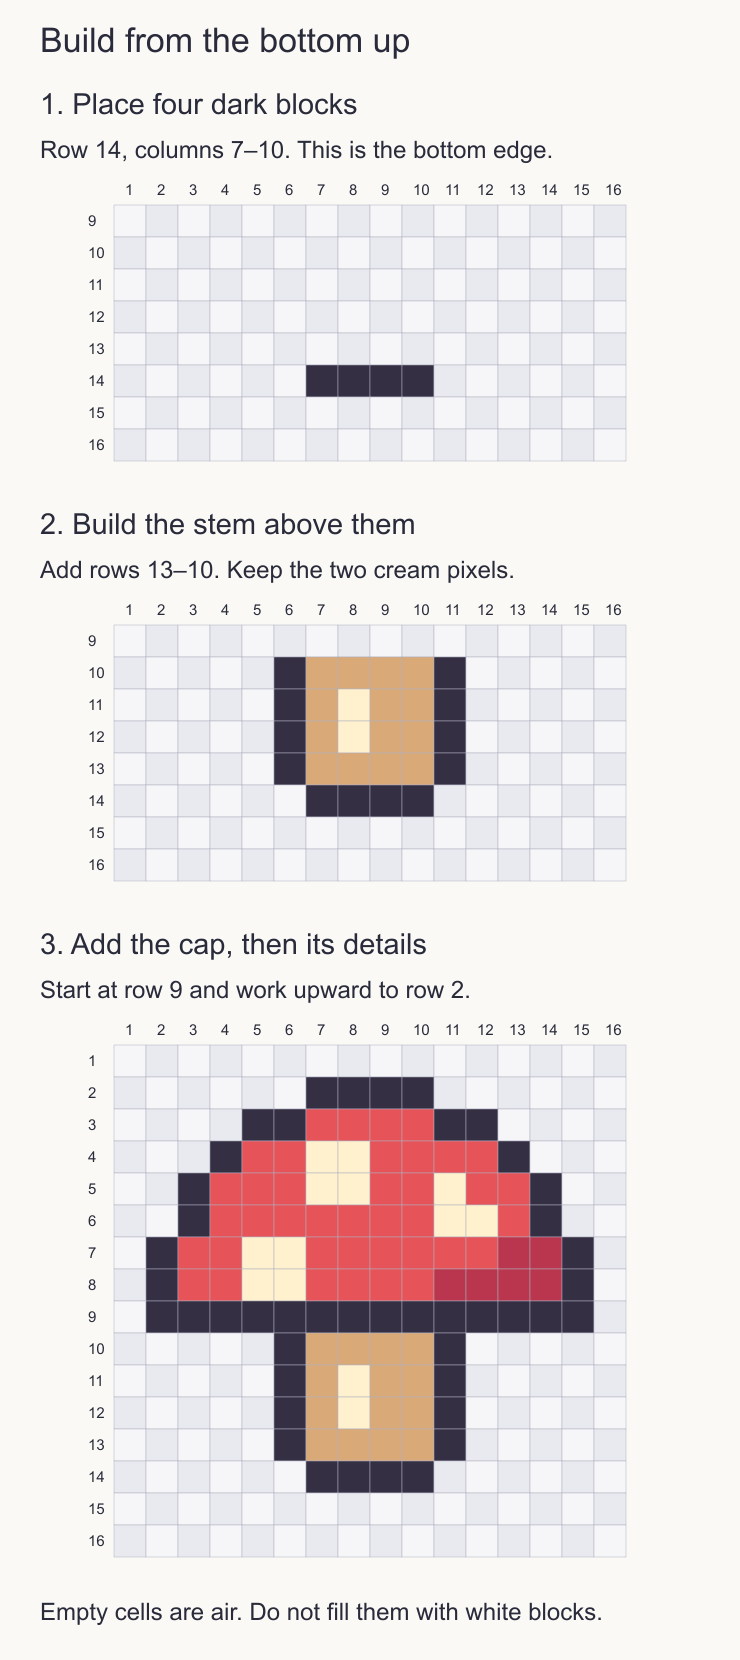
Read the chart from the bottom up while building. The first four blocks are in columns 7–10 of row 14.
Leave dots empty. If you use temporary support blocks to reach or position a row, remove them when that section is complete. Step back far enough to see the whole mushroom; close-up block textures can distract from a shape that reads clearly at a distance.
You can double its size later by replacing every chart cell with a 2×2 square of blocks. That needs four times as many artwork blocks: 464 instead of 116, before temporary supports. Finish the smaller version first so a counting mistake is easy to correct.
Common beginner questions
Do I need to be good at drawing to make pixel art?
You can start with a simple subject and a small grid. The exercise is about choosing which squares carry the shape. A mushroom, heart, or leaf lets you practice that choice without solving anatomy, perspective, and animation at the same time. Copy the example once, then change its shape or colors to make another version.
Why does my pixel art look messy?
Check for isolated pixels, uneven edges, and too many nearly identical colors. Remove a questionable detail and look at the image at a smaller zoom. If the subject becomes easier to recognize, leave the detail out. Add complexity only when it helps the shape read.
Can I use this mushroom in my own project?
Yes. You may use, adapt, and share this tutorial's mushroom artwork, including in commercial projects. Keep the native PNG as your source and use an enlarged copy for presentation. The five-color pattern also works as a starting point for your own grid drawing or block mural.
Draw a second object on a blank pixel art grid, keeping the same order: outline, flat colors, small details, then a crisp export.
Author
