
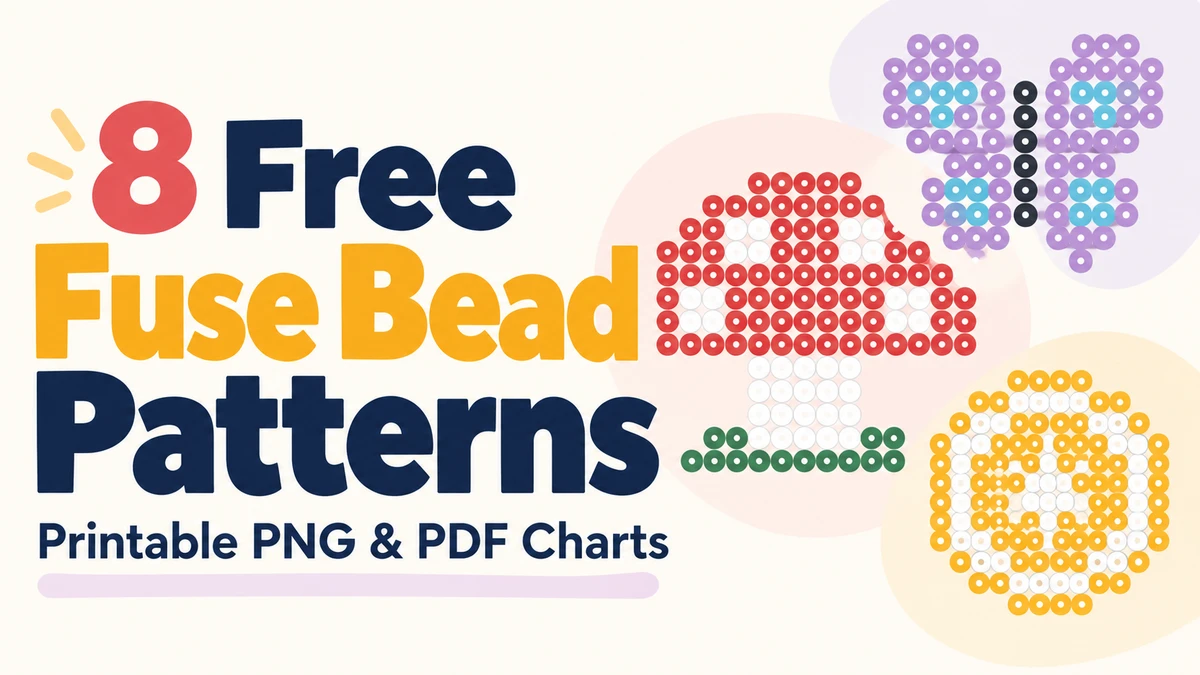
8 Free Fuse Bead Patterns with Printable PNG & PDF Charts
Find 8 easy fuse bead patterns with numbered PNG charts, A4 and Letter PDFs, exact color counts, and helpful tips for making each design on a square board.
Pick from eight free fuse bead patterns below. Each has a numbered PNG chart, A4 and US Letter PDFs, and a color-by-color bead list. All fit a compatible 29 × 29 square pegboard; the widest is 15 pegs and the tallest is 16.
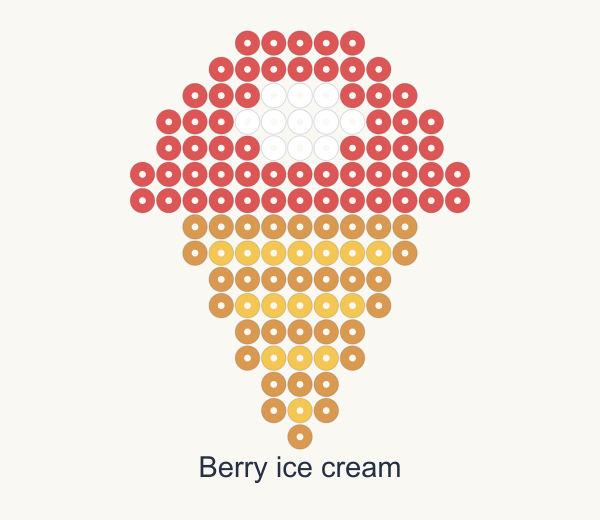
Choose an easy fuse bead pattern
For a first project, choose between repeating a shape and placing small details. The diamond uses 61 beads in two colors, with matching rows above and below its center. The lemon also uses two colors, but its 137 beads make it the largest project by bead count. Choose it if you prefer filling broad color blocks to placing eyes or wing spots.
If you already have a mixed bead box, check the accent quantities before picking a design. The cat needs only two dark eye beads and four white muzzle beads, while the owl needs 14 white beads and 67 dark ones. They offer very different ways to use the same three colors. For symmetry practice, choose the butterfly and work on both wings together.
| Pattern | Grid (width × height) | Beads | Colors | Good for |
|---|---|---|---|---|
| Striped diamond | 11 × 11 | 61 | 2 | Repeating two-color shape |
| Lemon slice | 13 × 13 | 137 | 2 | Large color blocks |
| Red tulip | 14 × 15 | 94 | 3 | First flower |
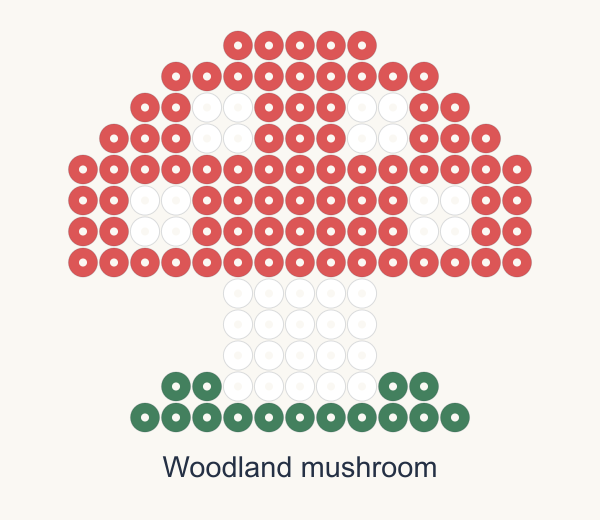
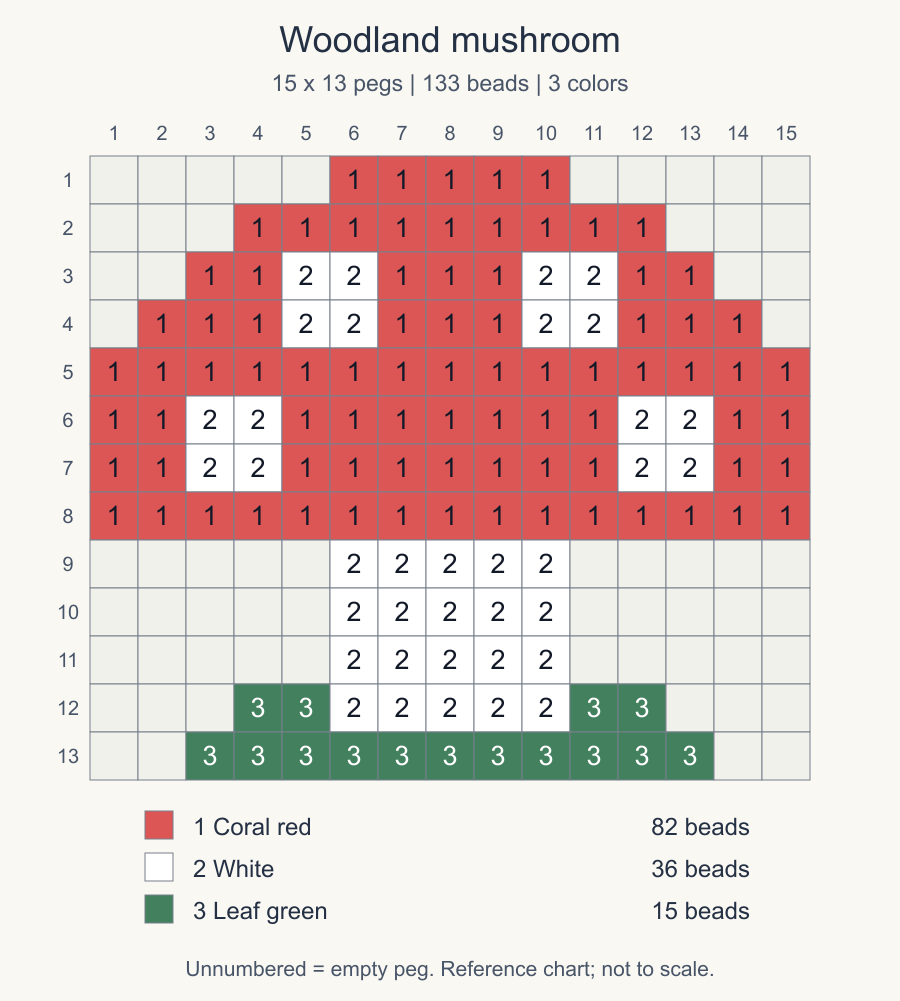
| Woodland mushroom | 15 × 13 | 133 | 3 | Chunky woodland motif |
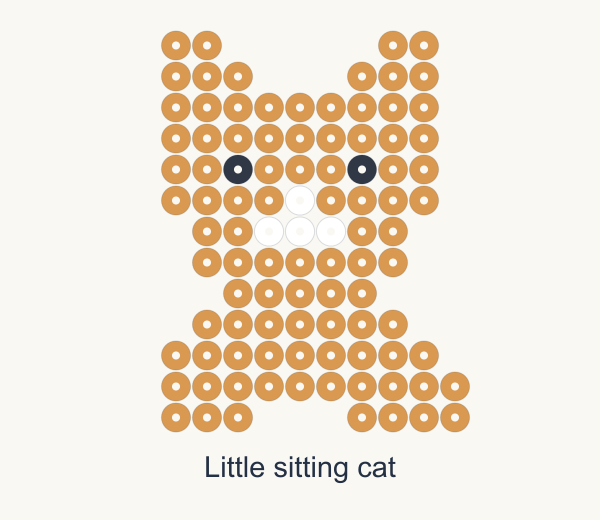
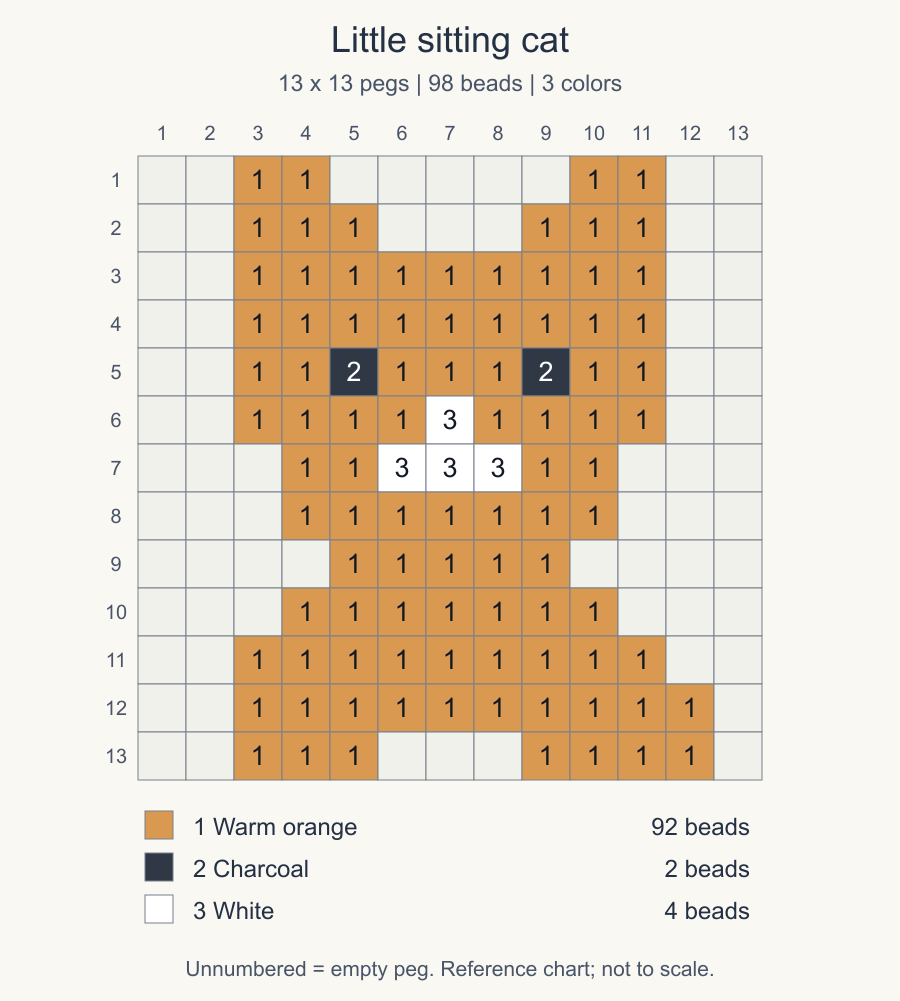
| Little sitting cat | 13 × 13 | 98 | 3 | Small face details |
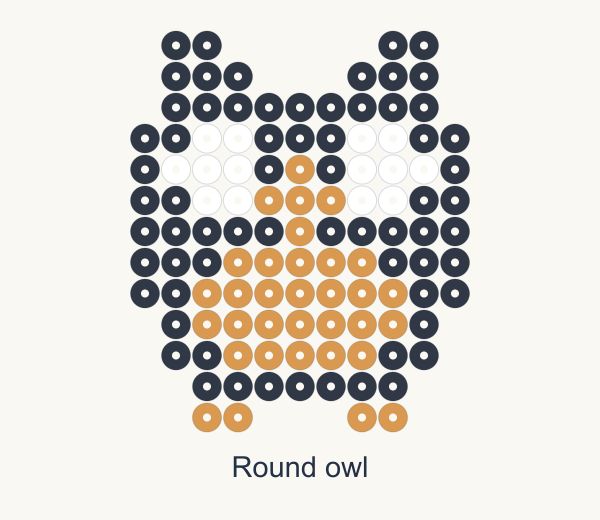
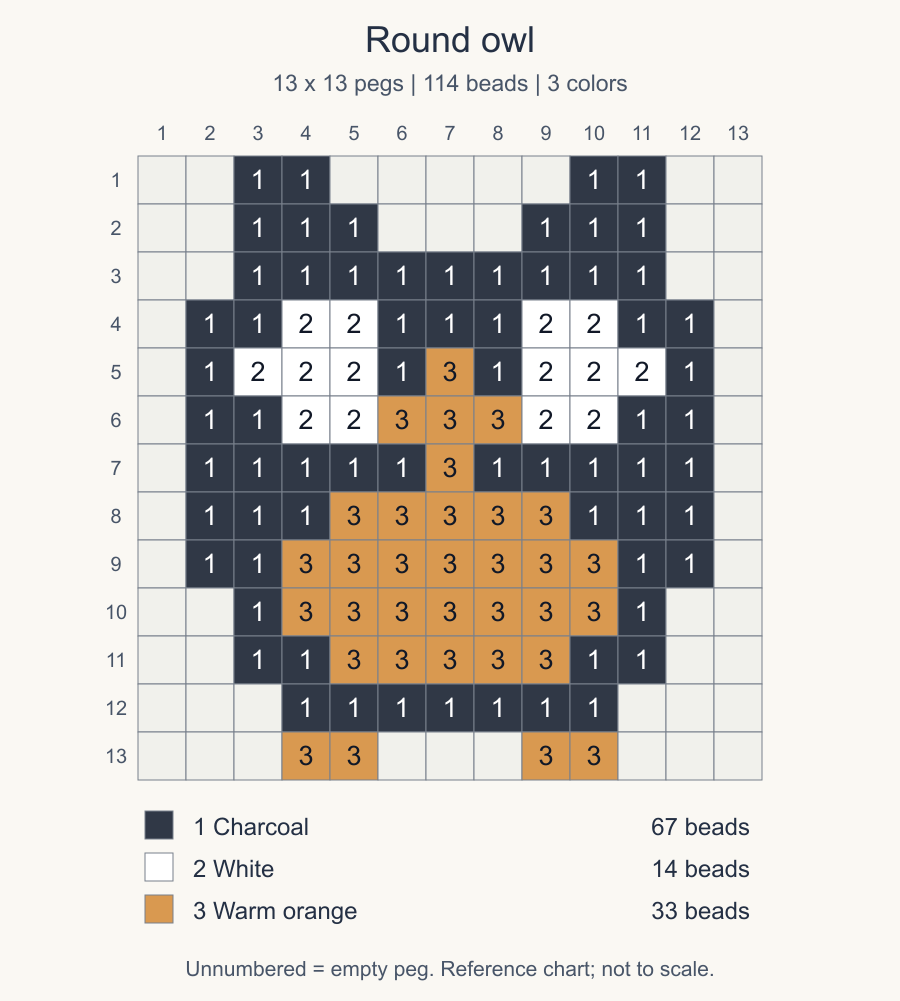
| Round owl | 13 × 13 | 114 | 3 | Matching eye patches |
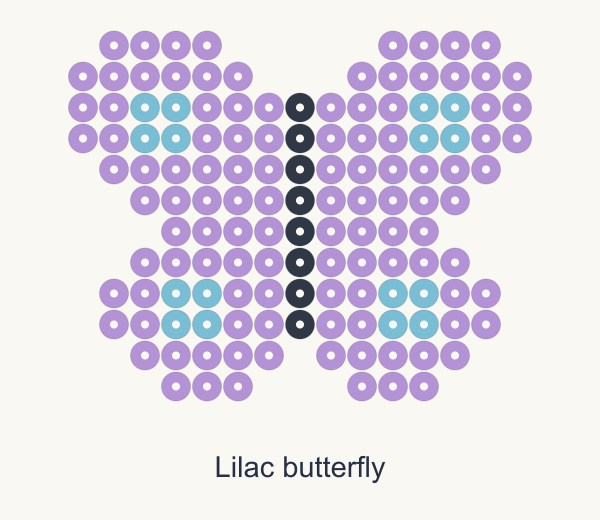
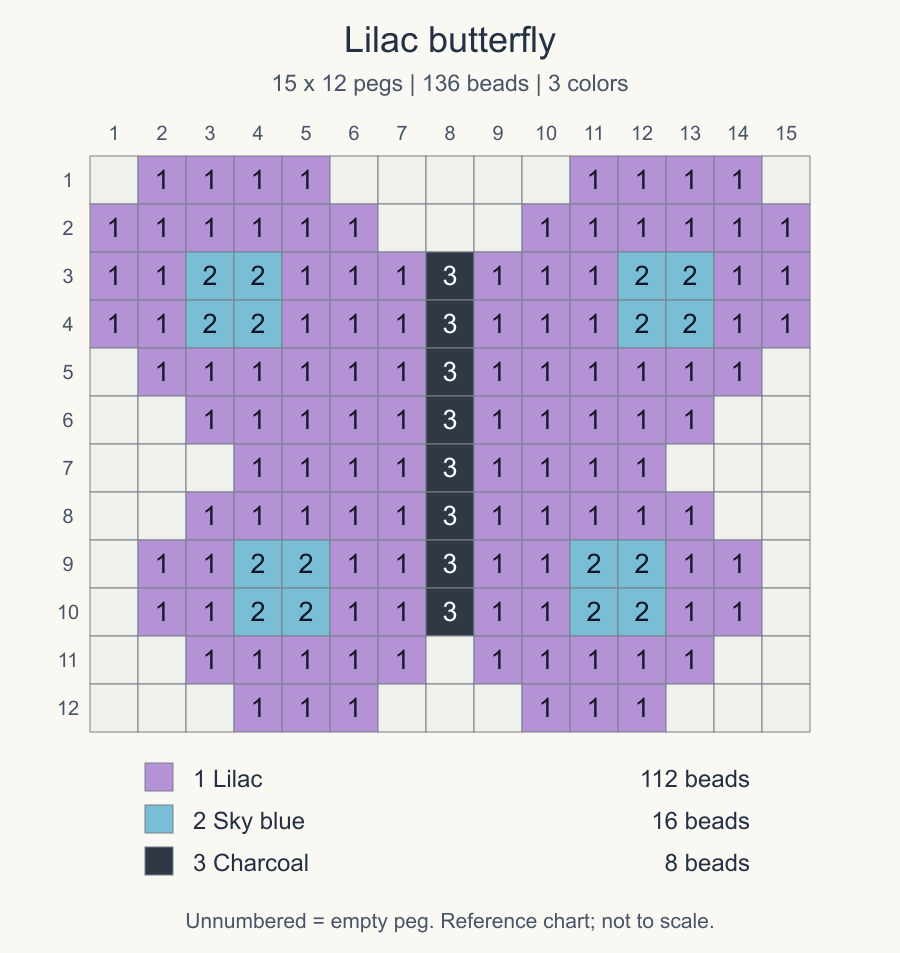
| Lilac butterfly | 15 × 12 | 136 | 3 | Symmetry practice |
| Berry ice cream | 13 × 16 | 118 | 4 | Following alternating rows |
Gather your beads and choose a download
Match your bead size to the square pegboard and sort the quantities in your chosen pattern’s color table. Tweezers help with small details such as the cat’s two eye beads. Set aside the accent beads first, then count the main color; this lets you choose a replacement before the board is half filled.
Keep the numbered chart beside the board and use the separate preview to choose colors. If several people are making different designs, give each person a printed PDF so they can mark completed rows while sharing the bead bowls.
| Download | Best use | What to do |
|---|---|---|
| PNG | Phone or tablet | Save and zoom in on the chart |
| A4 PDF | A4 paper | Print the single-page chart on A4 |
| US Letter PDF | US Letter paper | Print the single-page chart on Letter |
Print the PDFs as reference charts beside your board; they are not sized for placing underneath it. Use fit-to-page if an edge is clipped.
Read the chart before you start
Place one bead in each numbered cell, including numbered white cells; leave blank cells empty. The numbers identify colors in that chart, not brand color codes.
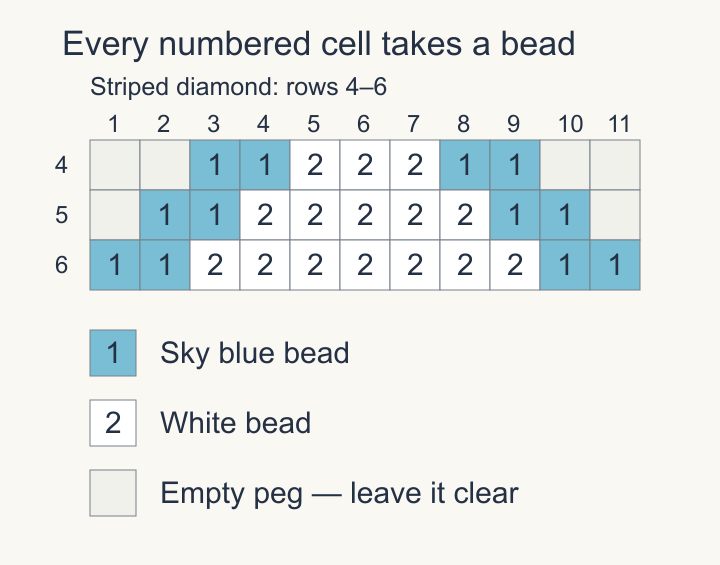
Use the row and column labels to line up each row’s starting position, including any blank spaces before the first bead.
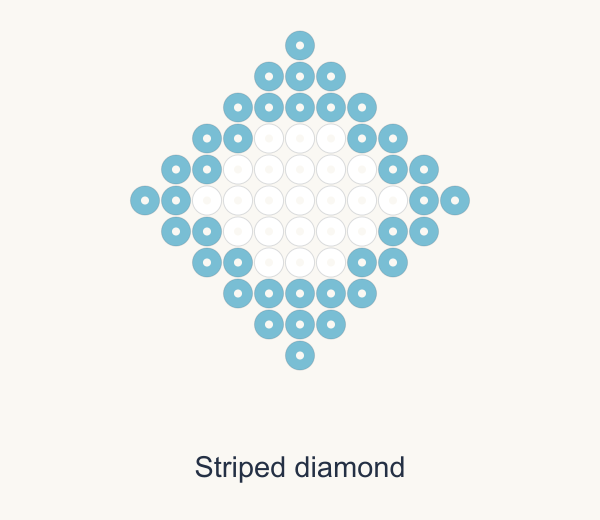
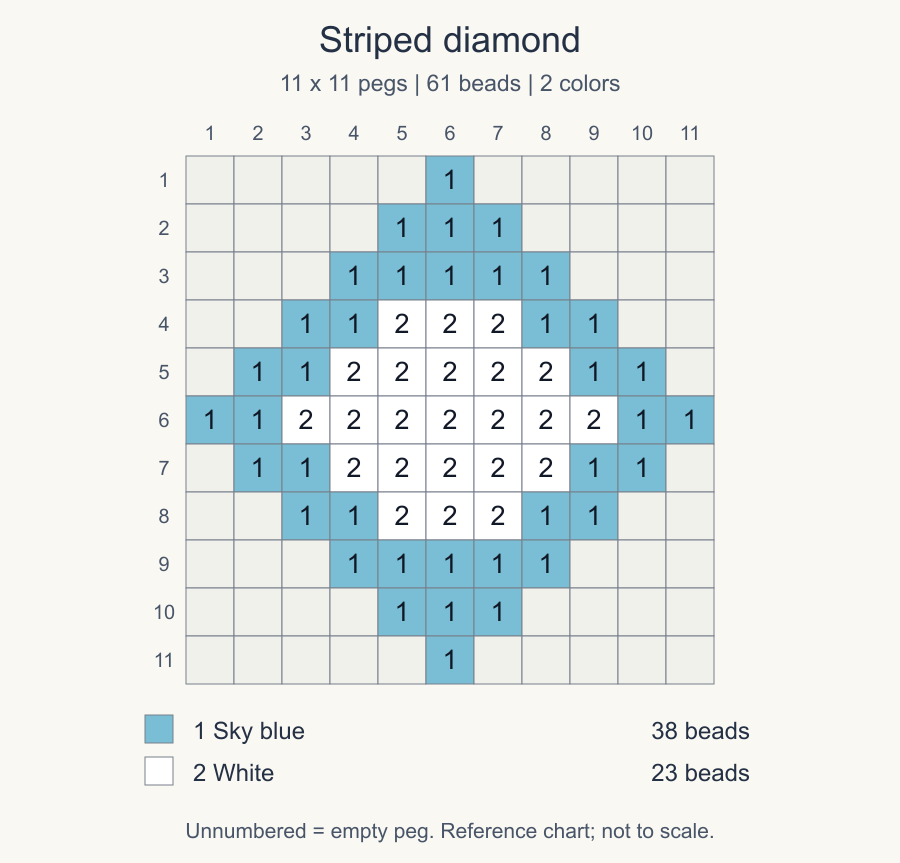
1. Striped diamond
11 × 11 pegs · 61 beads · 2 colors
The diamond has a simple outline and a centered white stripe, with no small face details.
Start with row 6: two blue, seven white, then two blue beads. Add rows above and below in matching pairs, ending with a single blue bead at each tip.
The white stripe narrows to five beads in rows 5 and 7, then three in rows 4 and 8. Each of those rows still has two blue beads at either end. Once the stripe is finished, the remaining three rows at each tip use only blue, so you can complete the outline without switching colors again.
For a matching pair, make one blue-and-white diamond and another in a favorite color with the same white stripe. Each needs 38 beads of its main color and 23 white beads; changing the main color keeps the repeating shape easy to follow.
| Chart number | Color | Beads |
|---|---|---|
| 1 | Sky blue | 38 |
| 2 | White | 23 |
Download striped diamond PNG · A4 PDF · US Letter PDF
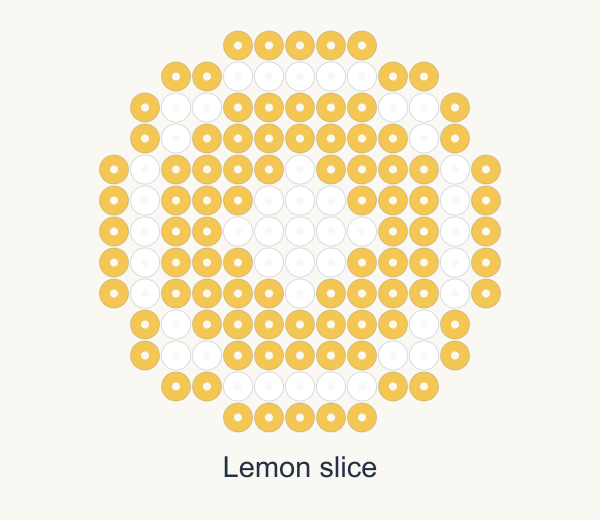
2. Lemon slice
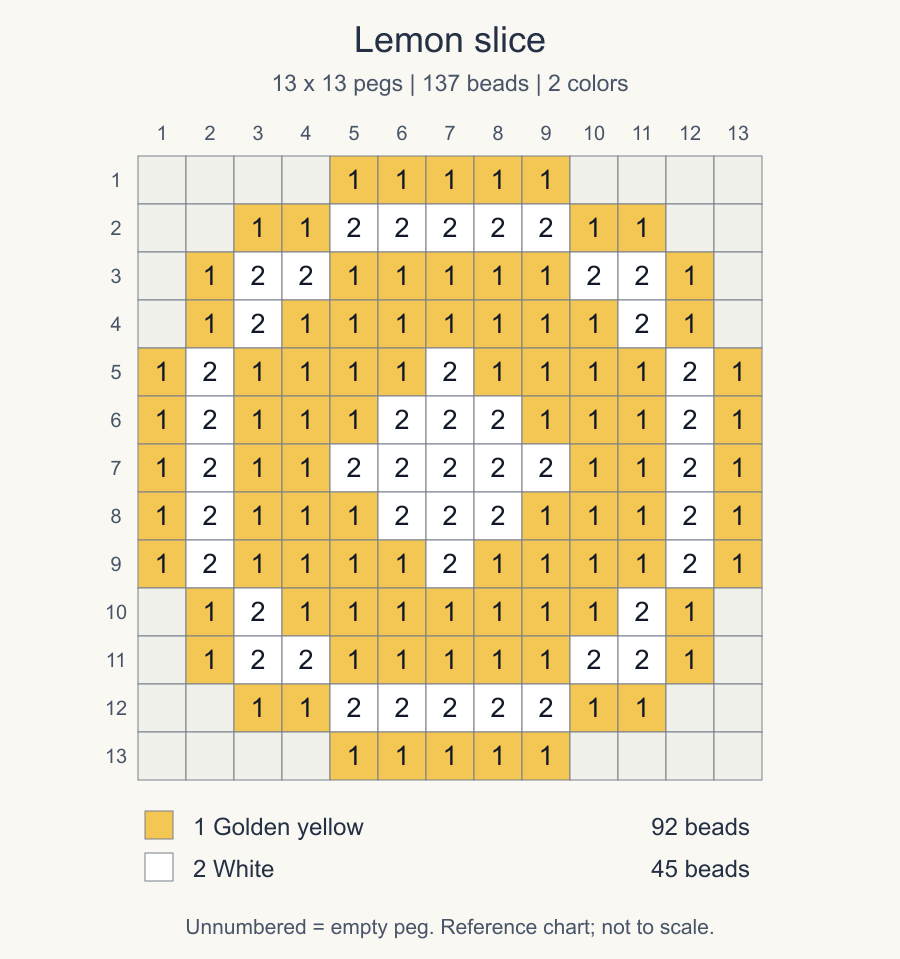
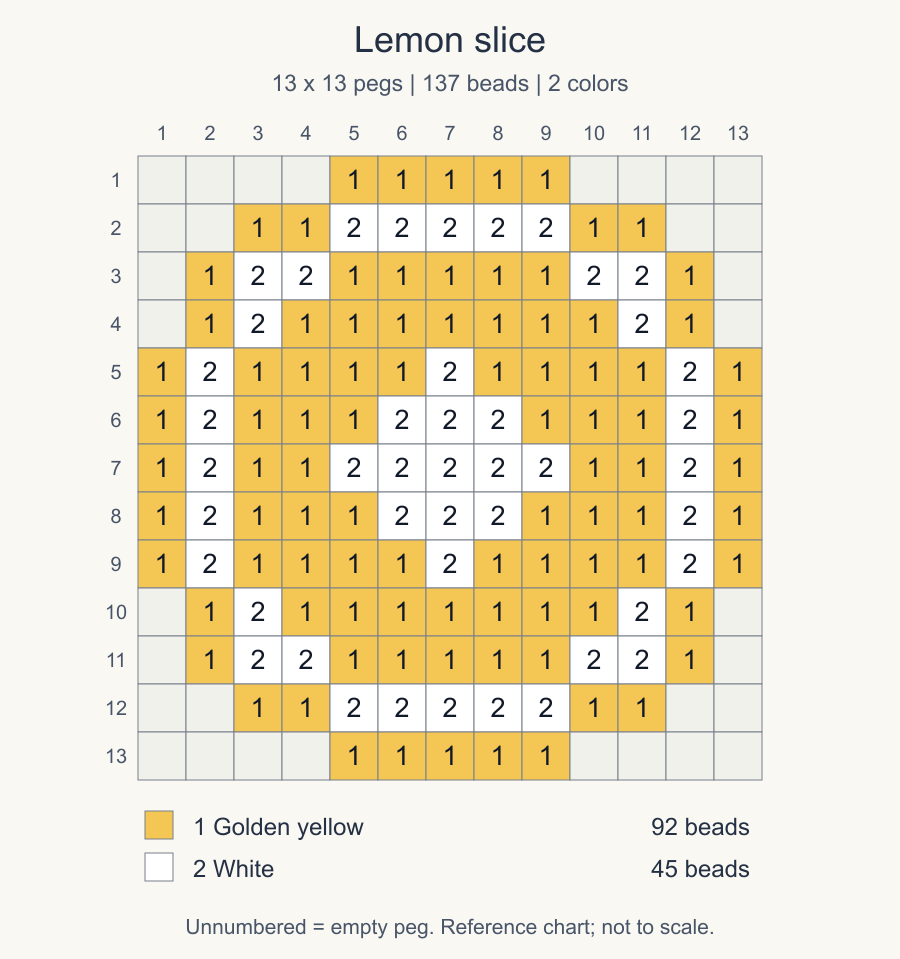
13 × 13 pegs · 137 beads · 2 colors
The lemon has a white rind ring and a separate white diamond in the middle. These give you two landmarks for keeping the round shape centered as you fill the yellow sections.
Begin with the five white beads at row 7, columns 5–9, then fill the surrounding yellow and build outward. Follow the white ring around the interior to keep the rind continuous.
The center runs through rows 5–9, with one, three, five, three, then one white bead, all centered on column 7. Keep the yellow cells between this center and the rind ring. If one side starts looking wider, compare its row with the matching row on the other side of the center before continuing.
Swap the 92 yellow beads for orange or green to make an orange or lime slice. Keep the 45 white beads for the rind and center. Two slices in different main colors make a coordinated food pair without adding another chart to learn.
| Chart number | Color | Beads |
|---|---|---|
| 1 | Golden yellow | 92 |
| 2 | White | 45 |
Download lemon slice PNG · A4 PDF · US Letter PDF
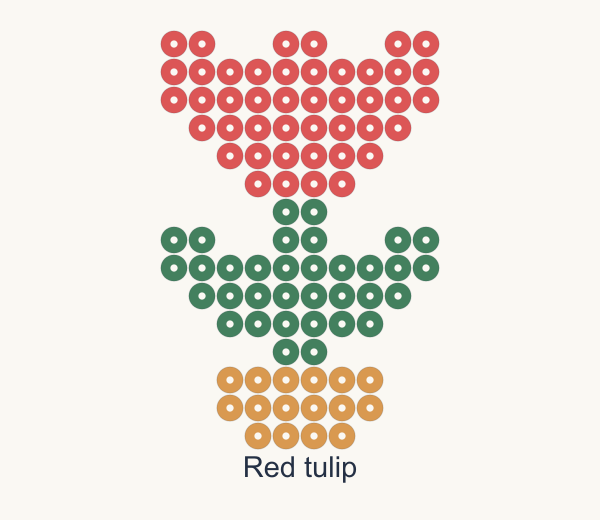
3. Red tulip
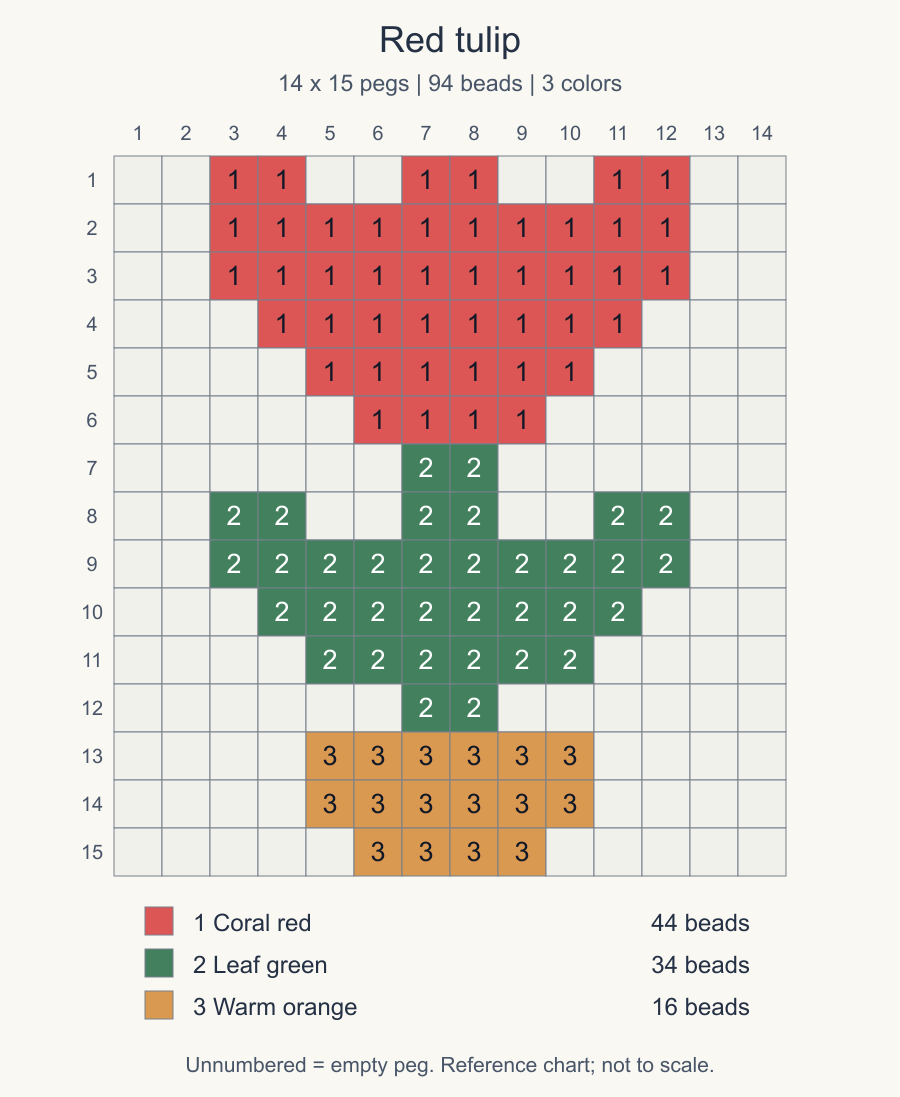
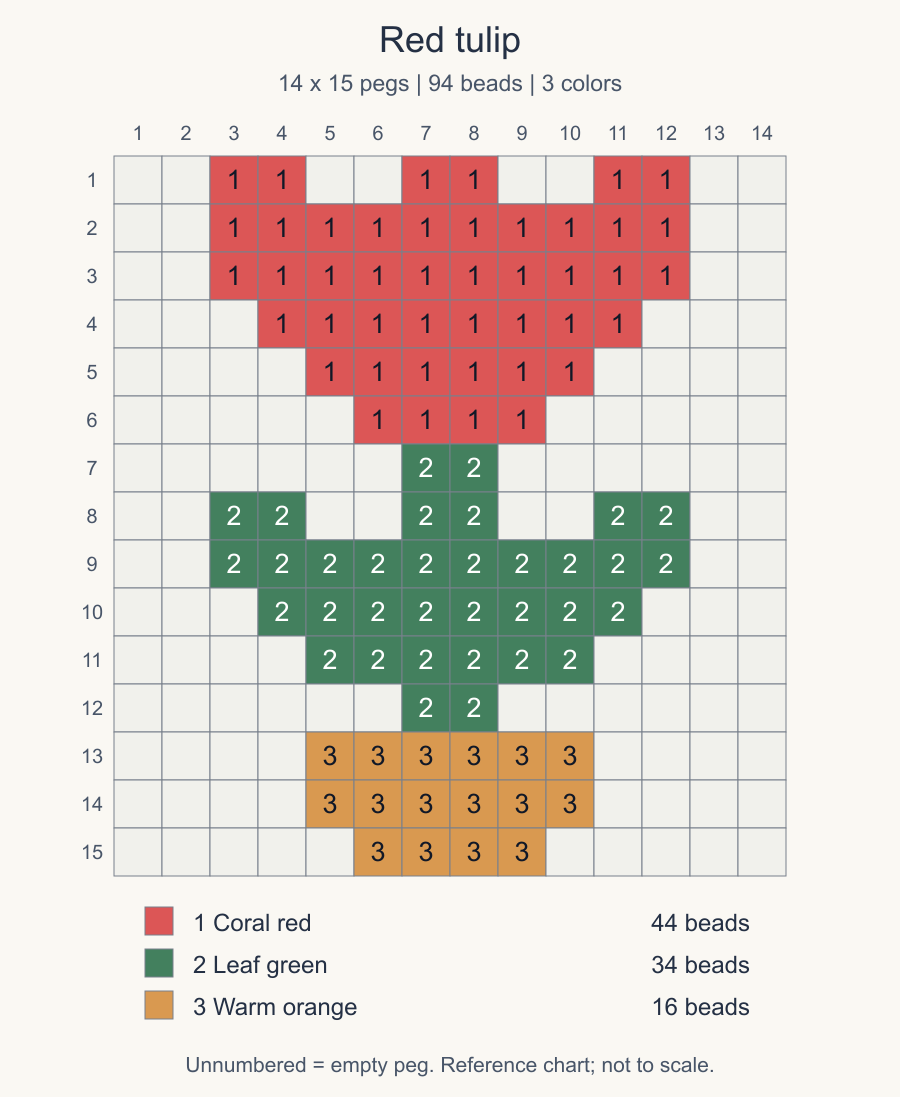
14 × 15 pegs · 94 beads · 3 colors
The tulip uses fewer beads than the lemon, but its outline changes more often: petal tips at the top, a narrow stem, leaves, then a small pot. Choose it when you want a plant design rather than a large area to fill.
Build the bloom in rows 1–6, starting with the three pairs of petal tips. Follow the green stem down columns 7 and 8, add the leaves on either side, then finish with the orange pot.
At row 8, the two leaf tips sit apart from the central stem; row 9 joins them into one green row. Place both tips before filling the row underneath so the leaves stay balanced. Below the leaves, the stem returns to two beads in row 12, directly above the six-bead top of the pot.
Pink or lilac can replace the 44 red bloom beads while the green leaves and orange pot stay the same. For a small flower collection, repeat the chart in different bloom colors and line up the pots along the bottom of a card or display backing.
| Chart number | Color | Beads |
|---|---|---|
| 1 | Coral red | 44 |
| 2 | Leaf green | 34 |
| 3 | Warm orange | 16 |
Download red tulip PNG · A4 PDF · US Letter PDF
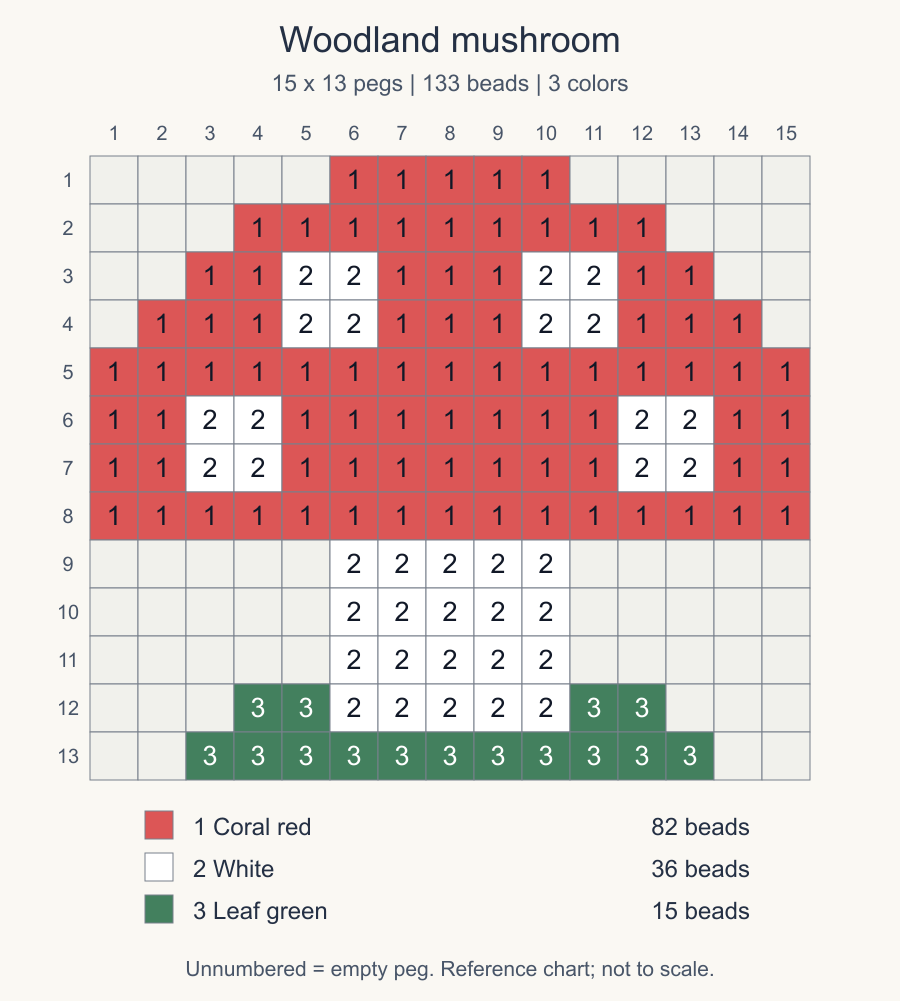
4. Woodland mushroom
15 × 13 pegs · 133 beads · 3 colors
The mushroom combines a broad spotted cap with a straight stem and a grassy base. Its four white spots are small blocks, so it offers more color changes than the lemon without the single-bead facial details of the cat.
Work through the cap in rows 1–8. The five-column white stem continues through rows 9–11 and into the green base; align it with the center of the cap.
Each cap spot is a 2 × 2 block. Place the upper pair in rows 3–4 and the lower pair in rows 6–7; the lower spots sit farther toward the cap edges. These spots use 16 of the 36 white beads. The remaining 20 form the stem, including the five white beads between the green tufts in row 12.
Brown or warm orange makes an earthier cap with the same light spots and stem. A cream replacement for white changes both areas together. Choose a cap color that remains clearly darker than the spots, then keep the grass green to separate it from the stem.
| Chart number | Color | Beads |
|---|---|---|
| 1 | Coral red | 82 |
| 2 | White | 36 |
| 3 | Leaf green | 15 |
Download woodland mushroom PNG · A4 PDF · US Letter PDF
5. Little sitting cat
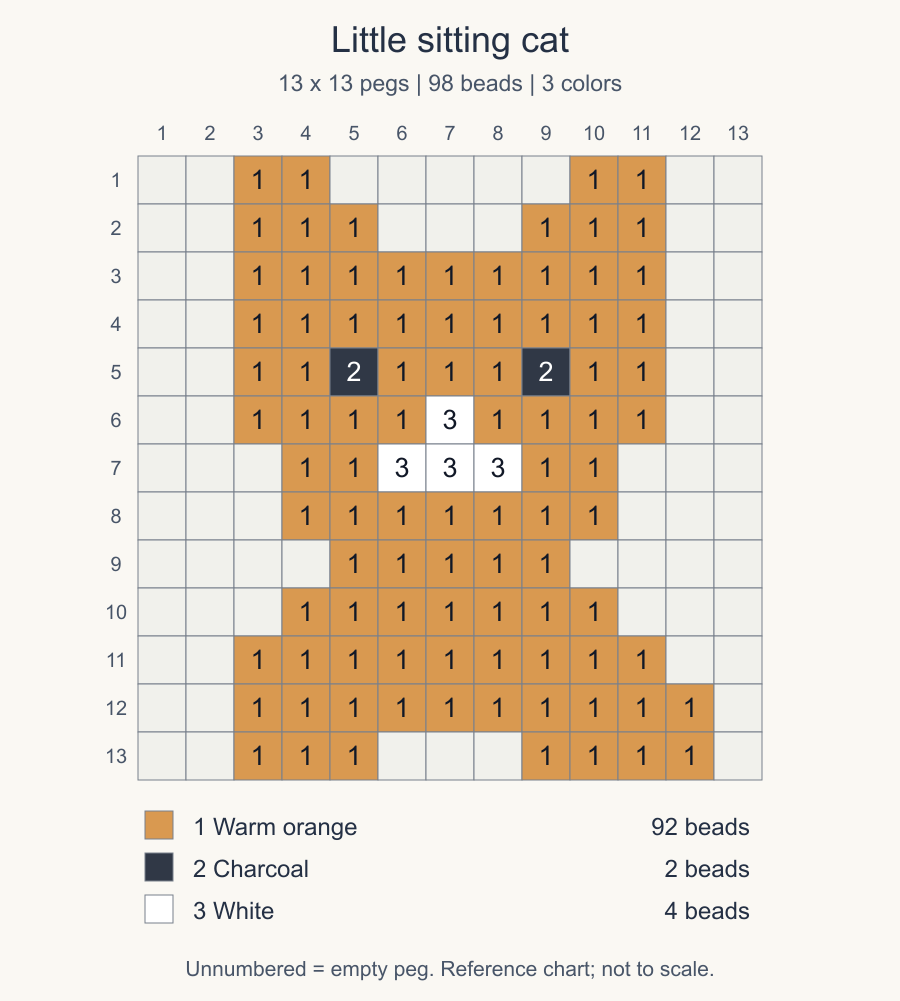
13 × 13 pegs · 98 beads · 3 colors
The cat needs only six detail beads: two charcoal eyes and four white muzzle beads.
Place the eyes at row 5, columns 5 and 9, and the muzzle below. Fill the head and body around them. Follow the right-hand tail as drawn; the two sides are deliberately different.
Use the muzzle to keep the face centered: one white bead sits at row 6, column 7, above three white beads in row 7. At the bottom, row 13 has three empty cells between the feet; leave that space open when completing the longer right foot.
For a gray or brown cat, replace the 92 orange body beads and retain the dark eyes and light muzzle. For a black cat, use 92 black body beads, two yellow eye beads and four white muzzle beads. The brighter eyes keep the expression visible against the dark body without changing any bead positions.
| Chart number | Color | Beads |
|---|---|---|
| 1 | Warm orange | 92 |
| 2 | Charcoal | 2 |
| 3 | White | 4 |
Download little sitting cat PNG · A4 PDF · US Letter PDF
6. Round owl
13 × 13 pegs · 114 beads · 3 colors
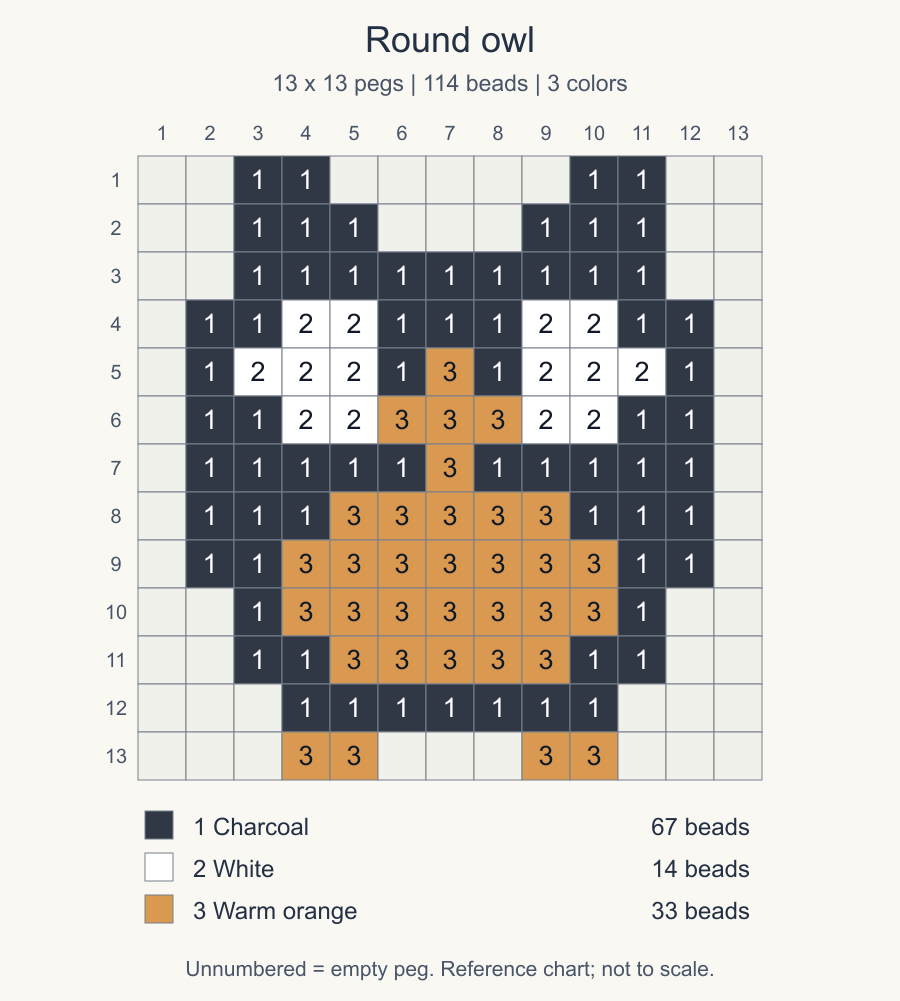
The owl gives you larger face details than the cat: two white eye patches around an orange beak, above a broad orange belly. It is a useful choice when you want an animal with repeated blocks rather than isolated eye beads.
Build the white patches in rows 4–6 around the orange beak at row 5, column 7. Add the dark outline, belly and feet, comparing the two eye patches across the middle column.
Each eye patch uses seven white beads arranged two, three, then two over those three rows. In row 5, a dark bead separates each patch from the beak. Keep those two dark separators in place so the white areas do not run into the orange center.
Brown can replace charcoal for a woodland palette. Lay it beside your white and orange beads before filling the owl: the white patches should stand out from the body, and the beak should remain distinct from the dark beads beside it. For a matching cat-and-owl pair, choose the same body and accent colors for both.
| Chart number | Color | Beads |
|---|---|---|
| 1 | Charcoal | 67 |
| 2 | White | 14 |
| 3 | Warm orange | 33 |
Download round owl PNG · A4 PDF · US Letter PDF
7. Lilac butterfly
15 × 12 pegs · 136 beads · 3 colors
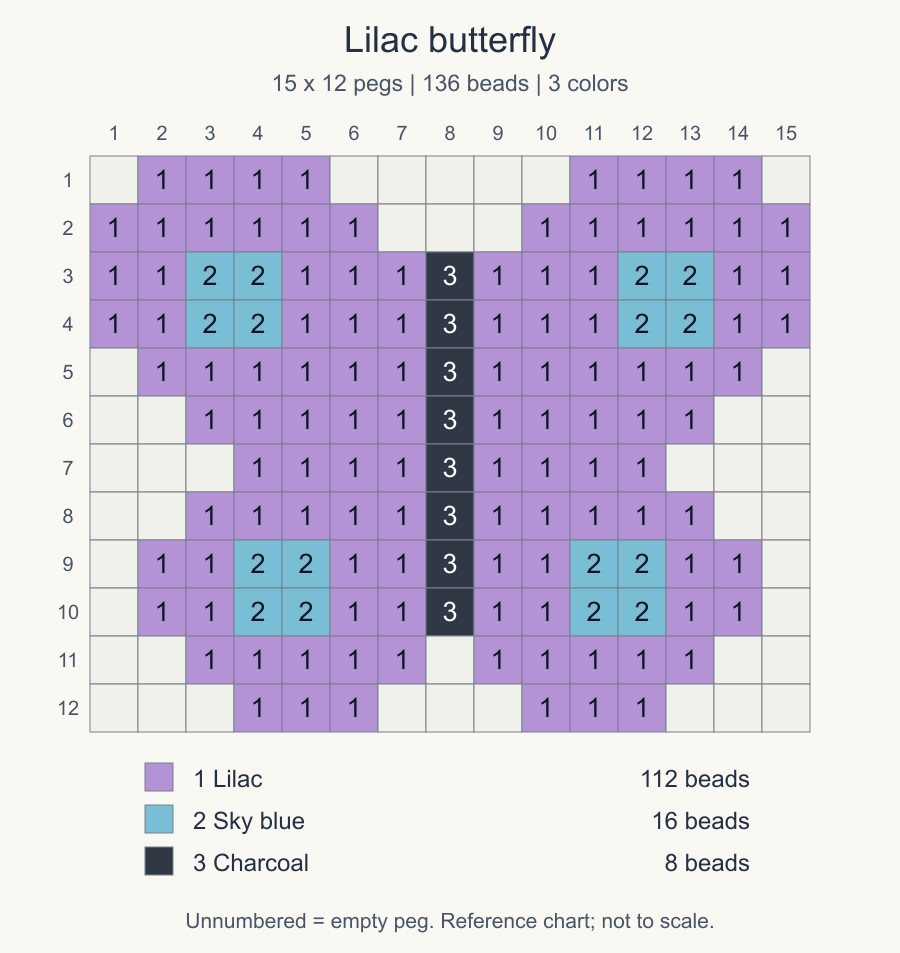
The butterfly has the widest span alongside the mushroom, but its repeated left and right wings give you a way to check each row as you go. Build matching wing rows as pairs rather than finishing one entire wing first.
Start with the dark body in column 8, rows 3–10. Work outward into the wings, checking each spot’s distance from the body.
Each wing has two blue 2 × 2 spots. The upper spots occupy rows 3–4; the lower spots occupy rows 9–10 and sit one column closer to the body. Copying the upper spots straight down would put the lower pair too far out, even if both wings still matched each other.
The last two wing rows continue below the body, with an open center between them. At the top, the two wing lobes also start separately before meeting the body in row 3. Follow those openings when finishing the outline.
| Chart number | Color | Beads |
|---|---|---|
| 1 | Lilac | 112 |
| 2 | Sky blue | 16 |
| 3 | Charcoal | 8 |
Download lilac butterfly PNG · A4 PDF · US Letter PDF
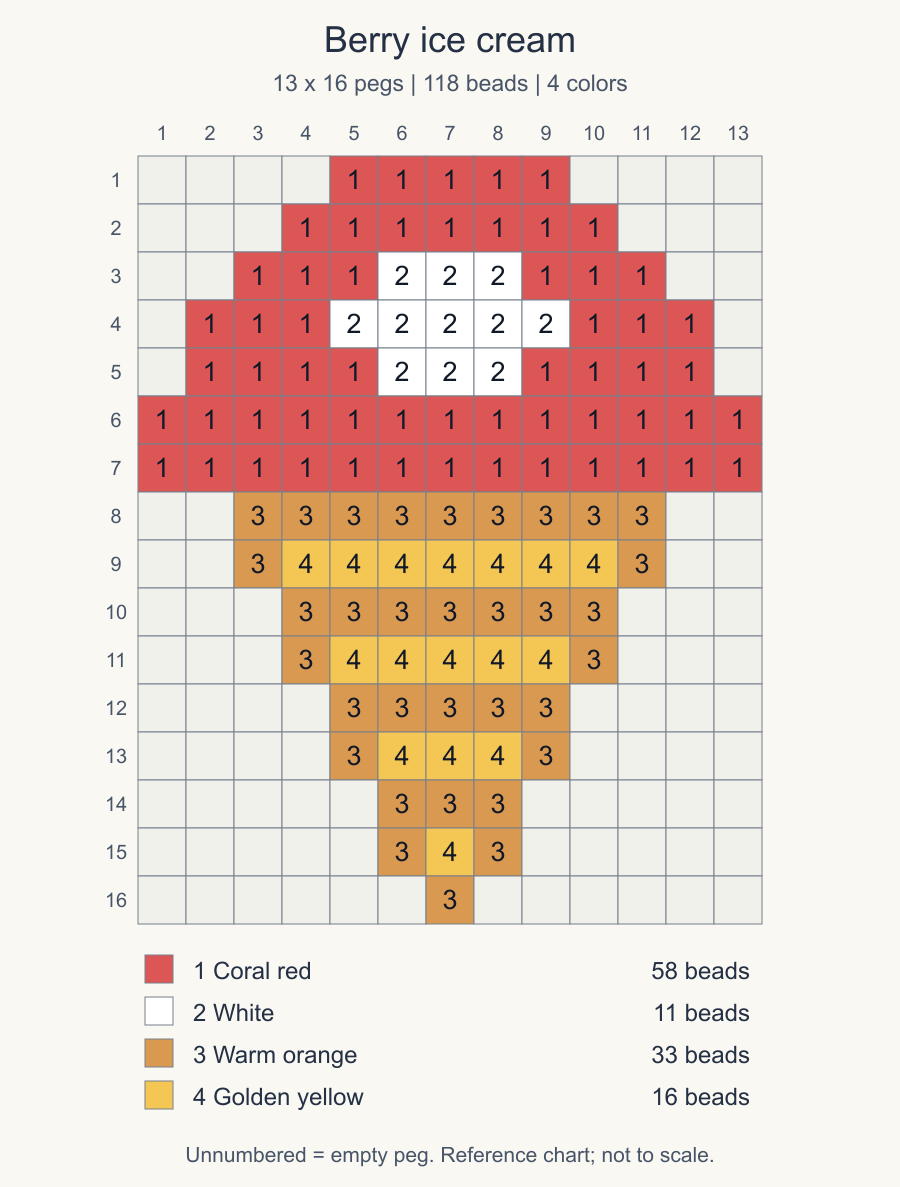
8. Berry ice cream
13 × 16 pegs · 118 beads · 4 colors
The ice cream is the tallest design and the only one with four colors. Its rounded scoop and tapered cone call for two different ways of following the rows.
Build the scoop in rows 1–7, then start the cone with nine orange beads in row 8.
The cone narrows in two-row pairs: nine, seven, five, then three beads wide. In each pair, the first row is all orange; the second has orange ends and a yellow center. Move inward one column at each side only when starting the next pair. Finish with the single orange bead in row 16.
For a strawberry or chocolate version, replace the 58 red scoop beads with pink or brown. The white highlight uses three beads in row 3, five in row 4 and three in row 5. Retain that light patch when changing the scoop color so it still reads as a rounded scoop above the cone.
| Chart number | Color | Beads |
|---|---|---|
| 1 | Coral red | 58 |
| 2 | White | 11 |
| 3 | Warm orange | 33 |
| 4 | Golden yellow | 16 |
Download berry ice cream PNG · A4 PDF · US Letter PDF
Try a different color palette
Choose a main color first, then an accent that is easy to distinguish beside it. For the cat, that means separating the eye color from the body; for the butterfly, it means separating the spots from the wings. Two appealing shades can look too similar once reduced to small blocks, so arrange a few actual beads together before committing to the palette.
Use the chart numbers to write a small replacement key beside your download. For example, the butterfly’s original key becomes 1 = coral, 2 = yellow, 3 = charcoal for the warm version below. You can follow the same numbered cells without trying to remember which original shade each new bead replaces.
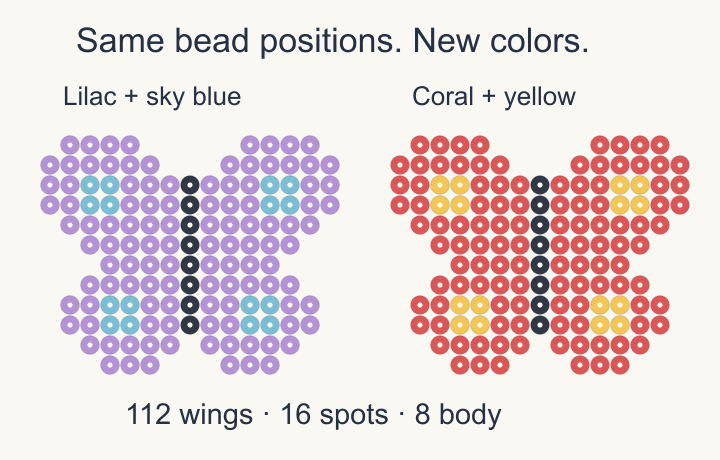
For the warm butterfly palette, use 112 coral wing beads, 16 yellow spot beads and 8 dark body beads with the original numbered chart.
If you want a softer palette, change the large wing areas to a pastel but keep a stronger spot color. Changing both to similarly pale shades removes the contrast that makes the four spots easy to see. For a coordinated collection, repeat one accent across different motifs rather than making every part the same color—for example, white stripes on diamonds and white rind details on citrus slices.
To make a two-color tulip, use the same shade for the bloom and pot. Combine their 44 and 16 beads into 60 pink beads, alongside the original 34 green beads for the stem and leaves. Mark both chart numbers 1 and 3 as pink on your replacement key.
Making the whole set? Sort 891 beads first
For one of every design in the original colors, gather the quantities below, plus a few spares.
| Bead color | Total for all eight designs |
|---|---|
| Sky blue | 54 |
| White | 133 |
| Golden yellow | 108 |
| Coral red | 184 |
| Leaf green | 49 |
| Warm orange | 174 |
| Charcoal | 77 |
| Lilac | 112 |
For a smaller set, choose a pair that shares colors:
- Cat and owl: 212 beads in three colors. Sort 125 orange, 69 charcoal and 18 white beads for one of each in the original palette. This gives you two animals with very different body shapes from the same color selection.
- Lemon and ice cream: 255 beads in four colors. Use 108 yellow, 56 white, 58 red and 33 orange beads. The yellow and white serve both designs, while the red scoop adds a second food motif.
- Tulip and mushroom: 227 beads in four colors. Gather 126 red, 49 green, 36 white and 16 orange beads for a flower-and-woodland pair.
Share the bowls by color name when using two charts: the cat’s number 1 is orange, while the owl’s number 1 is charcoal.
Check the design before fusing
Compare the outline with the numbered chart, then check the detail that identifies your chosen motif: the cat’s eyes, the butterfly’s inset lower spots or the ice cream’s paired cone rows. Do this while the beads can still be moved individually.
Have an adult handle the iron and follow your bead brand’s fusing instructions. For Perler beads, the standard fusing method uses ironing paper on a flat, heat-safe surface, followed by cooling before flipping and fusing the other side. Let the finished piece cool completely before mounting it.
If you are using an unfamiliar iron, practice on a small patch of spare beads first. Perler’s fusing tips explain how to judge the joined edges and adjust the iron before working on the full design.
Turn the finished patterns into a small gift
For a handmade card, use the tulip as a vertical centerpiece or the butterfly above a short message. Arrange the cooled motif on the folded card before attaching it, leaving room for the greeting and keeping the fold clear. Perler’s butterfly card instructions include a craft-glue assembly example.
For a small framed collection, try the cat and owl side by side, or two citrus slices in different colors. Set the pieces on your chosen backing before fixing them in place. A mid-tone background helps the white muzzle, eye patches or rind remain visible; leave space between the motifs so their outlines do not merge.
Make a pattern from your own picture
For a custom chart, follow how to make a Perler bead pattern using SpriteFuse’s pixel art grid generator. The guide covers choosing a grid size and simplifying the image before placing beads.
Author

Categories
More Posts

How to Make Pixel Art: Draw Your First 16×16 Mushroom
Learn how to make pixel art with a step-by-step mushroom tutorial, a downloadable grid, crisp PNG exports, and a Minecraft block-building plan for beginners.
How to Make a Tileset: Draw, Test, and Export Pixel Art
Learn how to make a tileset with a small grass-and-pond example. Draw edges and corners, check seams, export a PNG, and try the downloadable Godot project.
How to Make Pixel Art in Minecraft with a Block-by-Block Plan
Turn a picture into Minecraft pixel art: choose a build size, compare real block palettes, gather materials, and place each row from a numbered guide.