
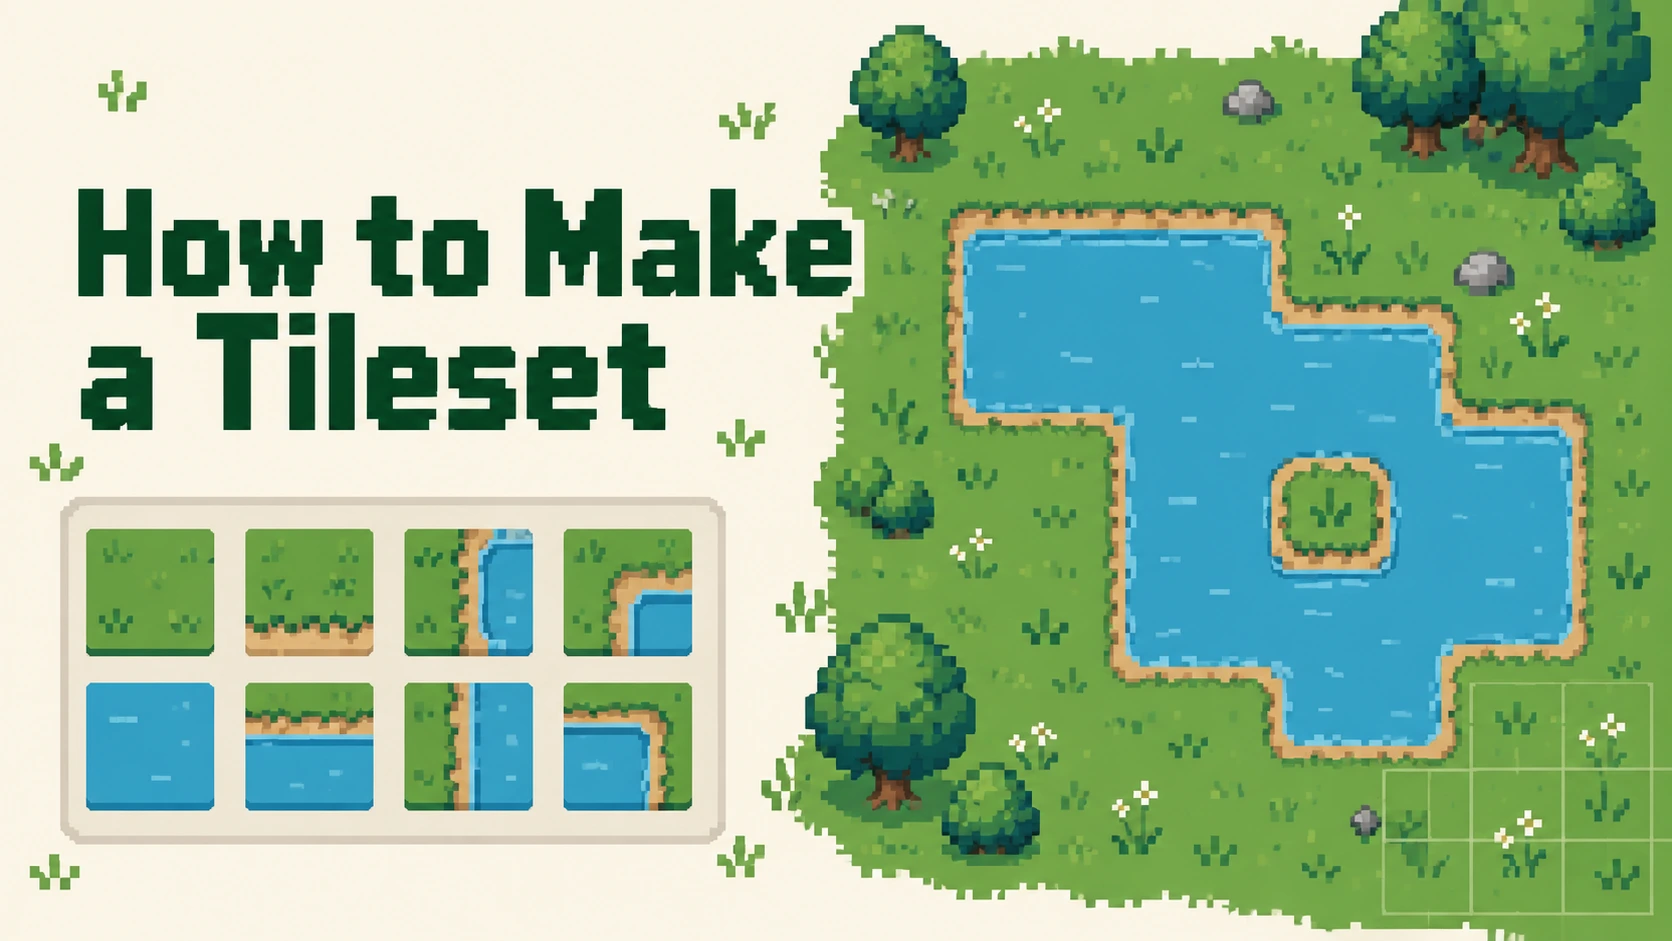
How to Make a Tileset: Draw, Test, and Export Pixel Art
Learn how to make a tileset with a small grass-and-pond example. Draw edges and corners, check seams, export a PNG, and try the downloadable Godot project.
To make a tileset, start with a small terrain texture, make it repeat cleanly, then add the edges and corners that your scene needs. Put the finished tiles in a regular PNG grid and test that same image in your game engine. A tile can look good on its own and still leave an obvious line when you place its neighbors.
This tutorial builds a familiar top-down scene: a small pond in grass. You will draw two 16×16 textures, build the shoreline, and use an inward bend to check the corners. The example has 14 terrain shapes plus two grass variations. It is deliberately small enough to understand and edit.
You can download the finished 64×64 tileset PNG to follow along, or open the editable Piskel file beside your own drawing. Keep the original-size PNG for importing; the enlarged pictures in this article are references. Tap a diagram for a closer view while you draw.

Decide what your tiles need to build
A tile is one reusable piece of artwork. A tileset is the collection of pieces available to you. A tilemap records where those pieces go in a scene. A sprite sheet packs images into one file; the images might be terrain tiles, character poses, or animation frames. Packing them together does not decide how their edges connect.
Select a tile to find every place it is used in this pond.
The collection stays the same; the map decides where each piece goes.
Sketch a little area before making dozens of tiles. For this pond, we need grass, open water, straight banks, corners around the outside, and a corner where the bank bends inward. Trees, bridges, buildings, and animated water can wait until this set works.
Choose a view and keep it consistent. The example looks down at the ground. A side-view platform needs a different drawing: its top surface and exposed wall have different jobs. An isometric set also needs different shapes. Start with one perspective rather than trying to reuse the same bank in all three.
If you already have individual tiles, you can skip the drawing steps and arrange them into a grid. For a base-image-and-border workflow, Tilesetter's generation guide explains how it combines those components. Either route still needs a test map.
Generate a first terrain set with SpriteFuse
If you want to try a terrain idea before drawing each piece by hand, the SpriteFuse Tileset Maker starts from a description. It creates sixteen 32×32 corner tiles for two ground materials, with a connection preview and a downloadable atlas. The drawing exercise below uses 16×16 tiles; keep that size difference in mind when choosing an import grid.
Describe the two surfaces that meet
Name the materials and add a few words about their look. For a familiar forest path, try:
Forest grass and a winding dirt path, warm pixel art.
You can attach an optional Reference image to guide the colors and texture. Sign in and choose Generate tileset. SpriteFuse builds the corner patterns and grid for you.

Inspect the connections and refine one tile
Use Terrain preview to inspect straight joins, bends and corners. Switch to Tiles to see the four-by-four atlas. The forest-trail example below was made with the same terrain generator; its preview arranges the pieces so you can judge their connections. Build your own level layout in your map editor.
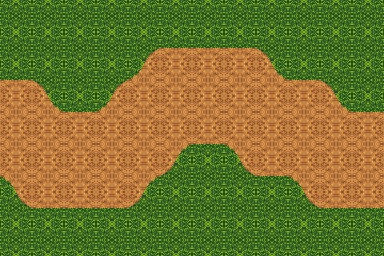
Choose Continue editing to open the same tileset in the workspace. Select the piece you want to change, describe the detail in the Agent composer, and choose Send. For a grass tile, you might ask for a few small flowers inside it. A single-tile edit keeps its connecting border and the other fifteen tiles in place.


This actual single-tile revision changes the interior while retaining the border. Recheck the edited piece in the terrain preview. To compare or return to an earlier successful result, open Versions and select that version before exporting. Generations and edits use Credits; check the amount shown before sending an edit.
Export the pack for your map editor
On the result page, choose Download tileset; in the workspace, use Export. The ZIP contains a 128×128 PNG atlas, sixteen individual tile PNGs, a terrain preview, tileset.json, tileset.tsx and a README.
Extract the pack and keep tileset.tsx beside tileset.png. In Tiled, open the tileset definition and use the Terrain Brush when painting a map. The file carries the two-material corner assignments. For Godot or Unity, import the atlas with a 32×32 grid and set up terrain rules and collisions in that editor; the Godot drawing walkthrough below uses its separate 16×16 example.
Free generations are for personal evaluation. Commercial use requires payment under SpriteFuse's Terms. Use the manual steps below when you want to draw and control each texture, bank and corner yourself.
Set up a 16×16 canvas and a small palette
Use a pixel editor that lets you enter exact dimensions and export PNG. Piskel is a free browser option. If you already use a desktop pixel editor, the same dimensions and colors work there.
In Piskel, select Create Sprite, open Resize on the right, and set both width and height to 16. Choose a one-pixel pen. Zooming makes the drawing easier to see; it does not change its size. Keep one frame while drawing a terrain tile, so a duplicate does not become an accidental animation frame.
These six colors cover the whole example:
| Use | HEX |
|---|---|
| Grass base | #6F9B48 |
| Dark grass marks | #527B35 |
| Light grass and bank rim | #89B85A |
| Dark bank | #315936 |
| Water base | #4B9EAF |
| Water ripples and waterline | #82C3C6 |
Click the primary color swatch to enter a HEX value. Fill the canvas with the base color, then use the pen for the small details. Keep the brush hard-edged: each mark should occupy whole pixels.
If the pencil, palette, or tiny canvas is unfamiliar, the beginner pixel art tutorial walks through those basics with a 16×16 drawing. Here we will concentrate on what changes when the artwork must connect to its neighbors.
Draw the grass and water before the bank
Fill the first tile with the grass base. Add two or three small, uneven clusters in the darker green, with a light pixel on the upper side of a couple of clusters. Leave room between them. A large distinctive mark will show up every time you reuse this tile.
For water, fill another 16×16 canvas with blue. Add two short horizontal ripples in the lighter blue. Three pixels can be enough for a ripple at this size. Keep the first and last rows and columns the base color for this first exercise; that gives you an easy border to match.
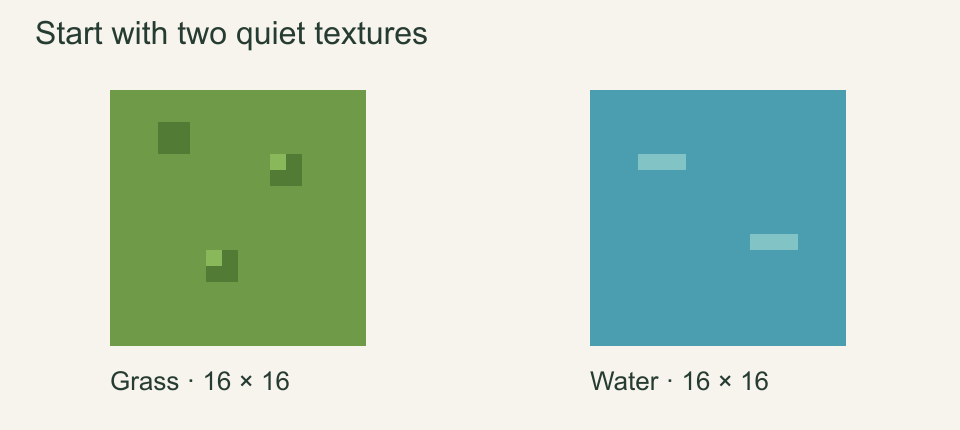
The two exact base patterns are available if you want to reproduce the example pixel for pixel. Your own grass marks and ripple positions can differ. The important part is checking them as repeated textures before making the bank.
Repeat each base tile in a 3×3 patch
Copy the tile across three columns and three rows, with no gaps. Look first at the joins, then at the repeated marks. Do the left and right edges meet? Do the top and bottom meet? Does a clump or ripple turn into a distracting stripe?
The comparison below adds a dark right border to the water on purpose. Repeating it creates a line at every tile boundary. Removing that border fixes the joins, while the ripple pattern is still visibly repeated.
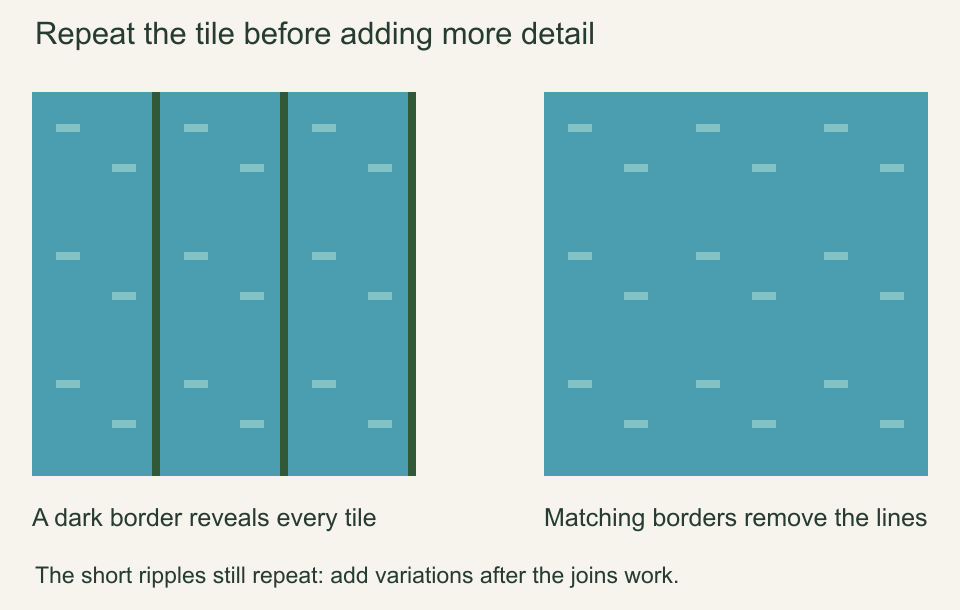
Fix the border before adding detail. If a mark crosses the right edge, continue it at the corresponding height on the left edge. Do the same for the top and bottom. A simpler option for your first tile is to move the mark away from the border.
Matching edges and hiding repetition are two different checks. Once the joins work, make another grass tile with fewer marks, then a third with the clusters in different positions. Keep their borders unchanged. Mixing those three tiles breaks up the repeated pattern without creating new gaps.
Make four straight banks and four outer corners
Start each bank tile from a copy of the water texture. The direction describes where the grass touches the water: a north bank has grass above it; an east bank has grass on the right.
For the north bank, use this simple five-row construction, counting rows from the top:
- Rows 1–2: grass green.
- Row 3: light green.
- Row 4: dark bank green.
- Row 5: light blue waterline.
- Rows 6–16: the water texture.
The grass therefore occupies the outside of the tile, and the bank runs across it at a fixed position. Make the other three banks with the same band widths along the corresponding side. Keep the ripples horizontal when you move the bank to another side; rotating the whole finished tile would rotate the water texture too.
An outer corner wraps those bands around two adjacent sides. For the northwest corner, grass occupies the top and left sides, the dark bank bends around the corner, and water fills the inside. Build the other three orientations the same way.
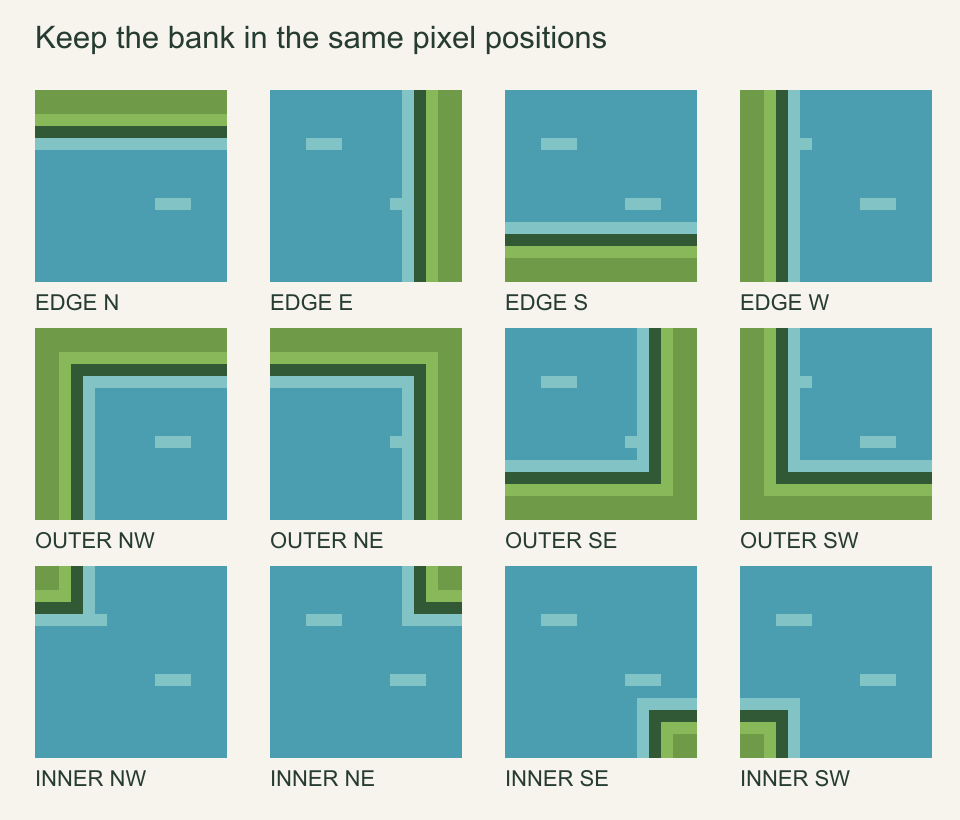
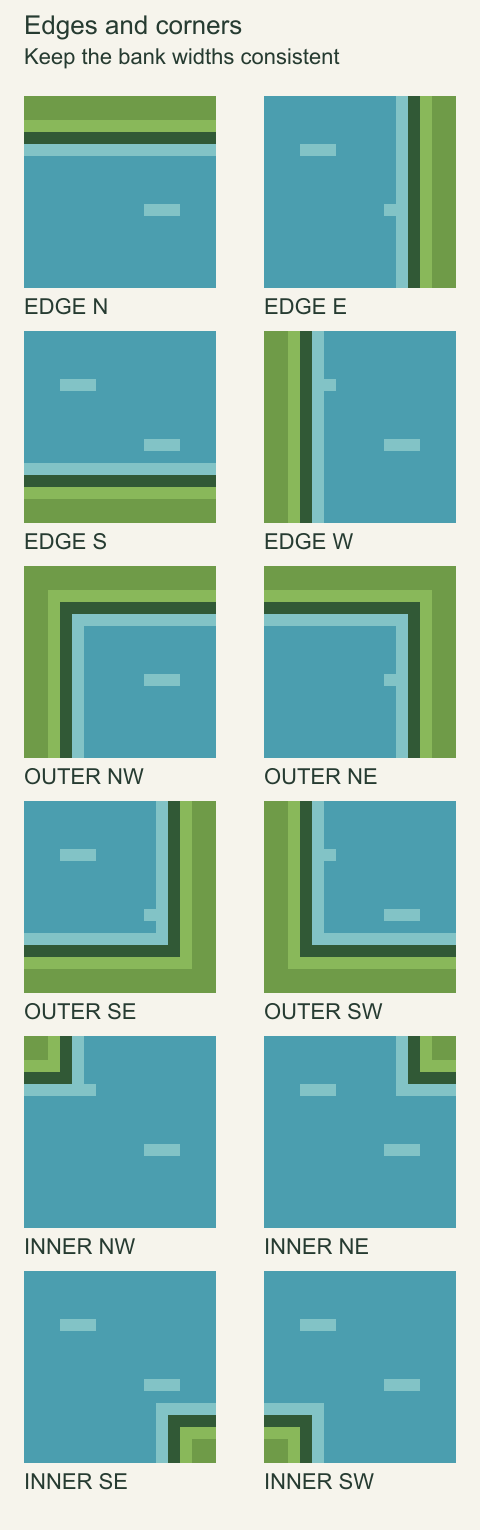
Compare neighboring tiles at their shared boundary. A bank that ends four pixels into one tile should continue four pixels into the next. Copying a working strip is more reliable than redrawing its position by eye.
Try a rectangular pond now. Put an outer corner at each corner of the rectangle, connect them with the straight banks, and fill the middle with water. This is a useful first test, but it does not exercise an inward bend.
Add inner corners with an inward-notch test
Cut a notch into one side of the pond so the water forms an L. At the bend, a water tile may have water directly beside it but grass touching one diagonal corner. A plain center tile will leave a break in the bank there.
An inner corner puts a small piece of grass into that corner of an otherwise watery tile. In our example, the inward bend needs the southwest version: grass reaches the tile's lower-left corner. Its little bank must join the bottom edge of the tile to its left and the left edge of the tile below.
To draw it, place a 2×2 grass square in the lower-left corner of a water tile. Wrap one pixel of light green around its two inward sides, then one pixel of dark bank, then one pixel of light blue. The little bands form nested corners. Compare the result with the southwest inner corner in the inventory above.
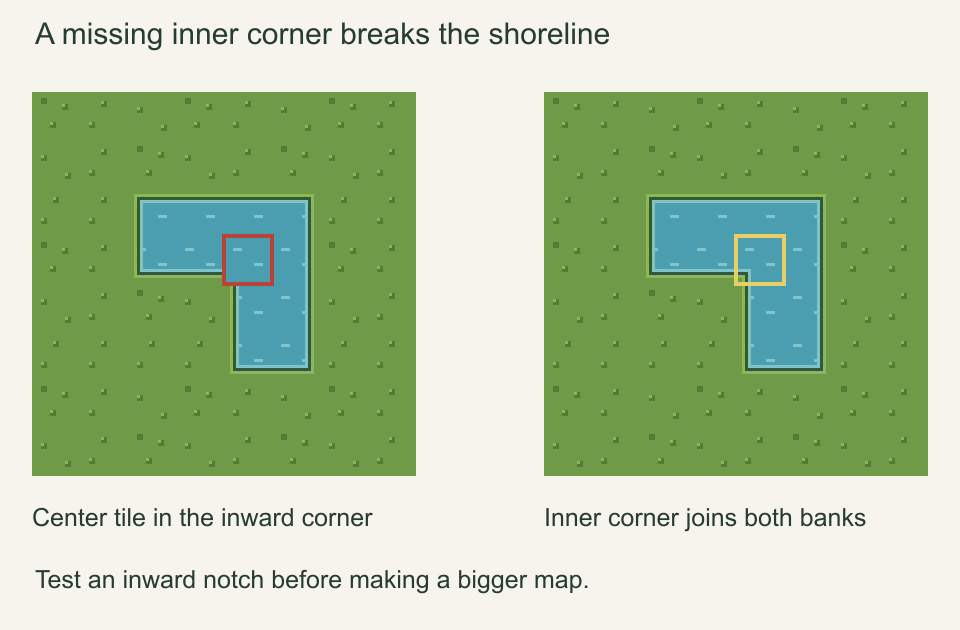
Make the other three orientations by moving that corner construction while keeping the underlying ripple direction. Then test every orientation you intend to use. A rectangle can hide missing inner corners; a notch makes the problem visible immediately.
This small set works for the pictured pond and other hand-placed shapes with enough room for the banks. A one-tile-wide stream, an isolated water tile, or several inward corners in the same cell needs additional combinations. Add those shapes when your map calls for them.
Arrange the tiles in one PNG
Create a 64×64 canvas and arrange the finished tiles in a 4×4 grid. Each cell is 16×16. Keep every tile at its original size and position it on a multiple of 16 pixels.
If you are enlarging a 16×16 Piskel canvas, turn Resize canvas content off and choose the top-left anchor before changing the dimensions to 64×64. That adds room around the original tile instead of stretching it. With Rectangle Selection, copy a 16×16 area, then hold Shift while dragging its pixels into the next slot. Select the original empty slot and paste to restore the first tile. The slot origins across the top row are (0,0), (16,0), (32,0), and (48,0); the next row starts at (0,16).
Our atlas puts grass and water first, then the four straight banks, four outer corners, four inner corners, and two extra grass textures. The layout file lists the coordinates. Names such as edge-n and inner-sw are useful when you return to edit a particular piece.
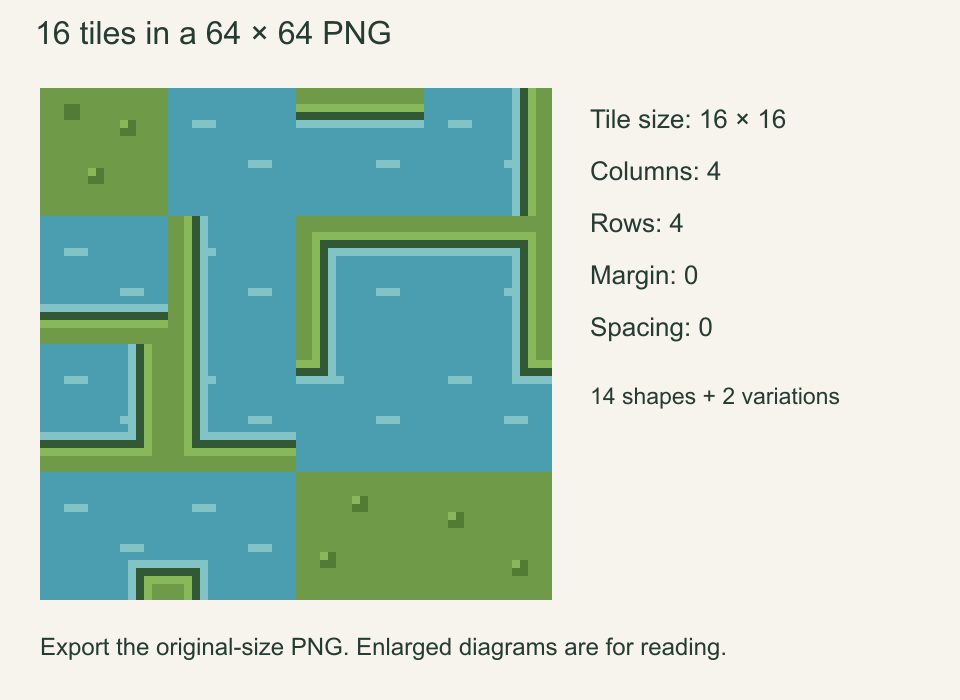
Leave margin and spacing at zero for this example. Do not draw the reference grid into the PNG. Grid lines belong in the editor or the explanatory picture; including them in the exported image would put lines into the map itself.
In Piskel, save the editable work with Save → Save as .piskel. Then open Export → PNG, keep the scale at 1.0×, and download the sheet. The full atlas should read 64×64, even if it looks much larger on your screen.
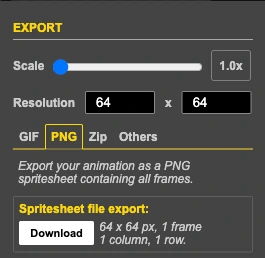
For existing individual images, GDS Tile Sheet Creator provides a grid-based arrangement workflow. Match its tile dimensions and grid to your inputs, and keep smoothing off for pixel art. Arranging images cannot fix artwork that does not join; use the same repeat and corner checks after packing.
Check the cells before importing
Open the PNG in the SpriteFuse Sprite Sheet Cutter. For this atlas, set 4 columns, 4 rows, zero margin, and zero spacing. The tool should show 16 cells of 16×16 pixels.
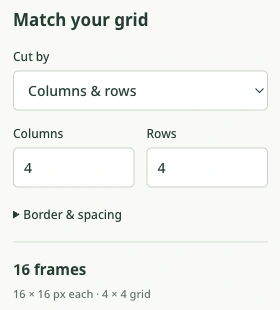
We took this PNG through Piskel export and the live cutter. With only two rows, the preview produced eight 16×32 crops: each crop contained two stacked tiles. Restoring four rows separated the tiles correctly. Every downloaded PNG then matched its original atlas cell.
Use that check to separate two problems. If the artwork is clipped or contains pieces of its neighbor, fix the cell size, rows, margin, or spacing. If the complete cells are correct but the bank breaks when placed beside another tile, return to the edge or corner drawing. Repacking the same pixels will not repair that bank.
You can download the individual PNGs as a ZIP if your editor needs separate files. A game engine that accepts an atlas can use the original single PNG instead.
Import the atlas into Godot and place a small map
In Godot, add a TileMapLayer and give it a new TileSet. Set the tile size to 16×16. Open the TileSet panel and add the PNG as an atlas. Check that Texture Region Size is also 16×16, with margins and separation at zero, then create the tiles from the image.
Select the tiles from the TileMap painting panel and reproduce a small rectangle or the L-shaped pond. Use nearest filtering for crisp pixel art. Enlarge the view by a whole-number scale when checking the pixels; resizing the source PNG is unnecessary.
The official Godot TileSet guide explains the atlas controls and the distinction between a tile's region size and its placement. If the image looks correct in your editor but wrong in the engine, compare those settings before redrawing the tiles.
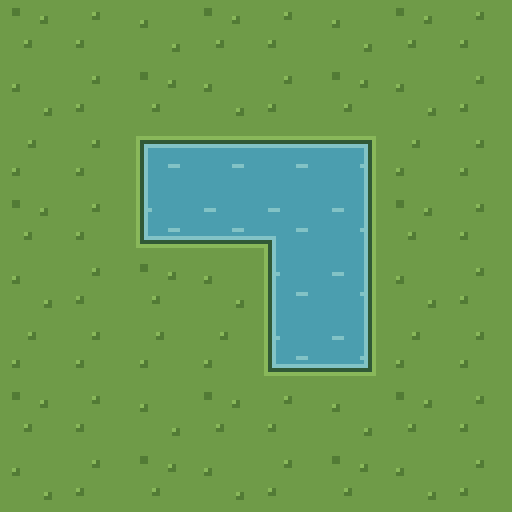
This pond was rendered from the same atlas used above. The downloadable project uses an 8×8 map and nearest filtering at four times the original pixel size. It gives you a small scene you can inspect and change, rather than only an enlarged picture of the artwork.
Autotiling is a separate setup. An engine chooses a neighboring tile automatically only after you supply the required combinations and connection rules. Sixteen cells in this PNG do not make it a 16-tile Wang template: two of our cells are grass variations. Tilesetter documents both 16-tile Wang sets and 47-tile Blob sets, which solve different connection layouts. Choose the template your engine or mapping tool expects before expanding the artwork.
For a browser-based map preview, Sprite Fusion lets you import a tileset and draw with it. Tiled also accepts image atlases or collections of individual images. Whichever editor you use, a little test area with straight banks and inward bends is enough to check this drawing; a full level is unnecessary.
Download the Godot pond example, open project.godot, and run the scene. Change a bank pixel or a grass mark, re-export your PNG, and place the changed tile beside its neighbors. That small cycle—draw, repeat, place, and inspect—is how to make a tileset you can keep building on.
Author

Categories
More Posts

How to Make Game Assets for Your First Game
Learn how to make game assets for 2D and 3D games, from a consistent asset list to sprites, UI, sound and a working Godot example you can download.
How to Make a Cross Stitch Pattern from a Photo
Make a cross stitch pattern from your photo: choose a clear crop, balance detail and colors, check the fabric size, and download a printable PDF with a thread list.
8 Free Fuse Bead Patterns with Printable PNG & PDF Charts
Find 8 easy fuse bead patterns with numbered PNG charts, A4 and Letter PDFs, exact color counts, and helpful tips for making each design on a square board.